Prefer to watch? The overview video
See the whole journey in one sitting — downloading the app, taking a first backup, and how full, incremental and differential backups differ. Then use the guide below whenever you need the details on a particular screen.
Prapl SQL Backup — free download for Windows, full, incremental & differential backups explained. Open on YouTube
What you need
- A Windows PC — Windows 10 or Windows 11, 64-bit. The app runs on the computer that can reach your database (for SQL Server, the same computer the database is installed on).
- The details of the database you want to protect — usually a server address, a username and a password. They're the same details your website or application uses; whoever set it up will have them. For SQLite you only need to know which folder the database file lives in.
- Somewhere to keep the backups — a folder, an external drive, a network drive, OneDrive, a cloud bucket (Amazon S3, Wasabi, Backblaze B2, Cloudflare R2, MinIO) or an SFTP/FTP server. A folder on your PC is fine to start with.
That's all. You don't have to install any database software, drivers or add-ons — every tool the app needs is built in, for all ten databases.
Download & install
Installing takes about a minute and asks only two questions.
- Download the installer and double-click it. If Windows asks whether the app may make changes to your device, click Yes — the installer needs this to place the app in
C:\Program Files. - Read the licence agreement, choose I accept the agreement and click Next.
- Choose your two options and click Next:
- Create a desktop shortcut — your call.
- Start with Windows (hidden in the tray, so scheduled backups always run) — we recommend leaving this ticked. Backups only happen while the app is running; with this on, it starts quietly every time you log in, so you never have to remember to open it.
- Click Install. The app, all the database tools and the Start-menu entries are copied in a few seconds.
- On the last page leave Launch Prapl SQL Backup ticked and click Finish. A short quick-start guide opens in your browser the first time; close it whenever you like.
The app installs to C:\Program Files\Prapl SQL Backup, and you'll find Prapl SQL Backup in the Start menu. Installing a newer version over an older one keeps all your jobs, settings and your licence.
First launch & your free trial
The first time the app opens, your 15-day free trial starts automatically — every feature unlocked, no credit card, nothing to activate. A blue strip along the top of the window shows how many trial days are left, with a Buy license button and an Enter key button for when you're ready.
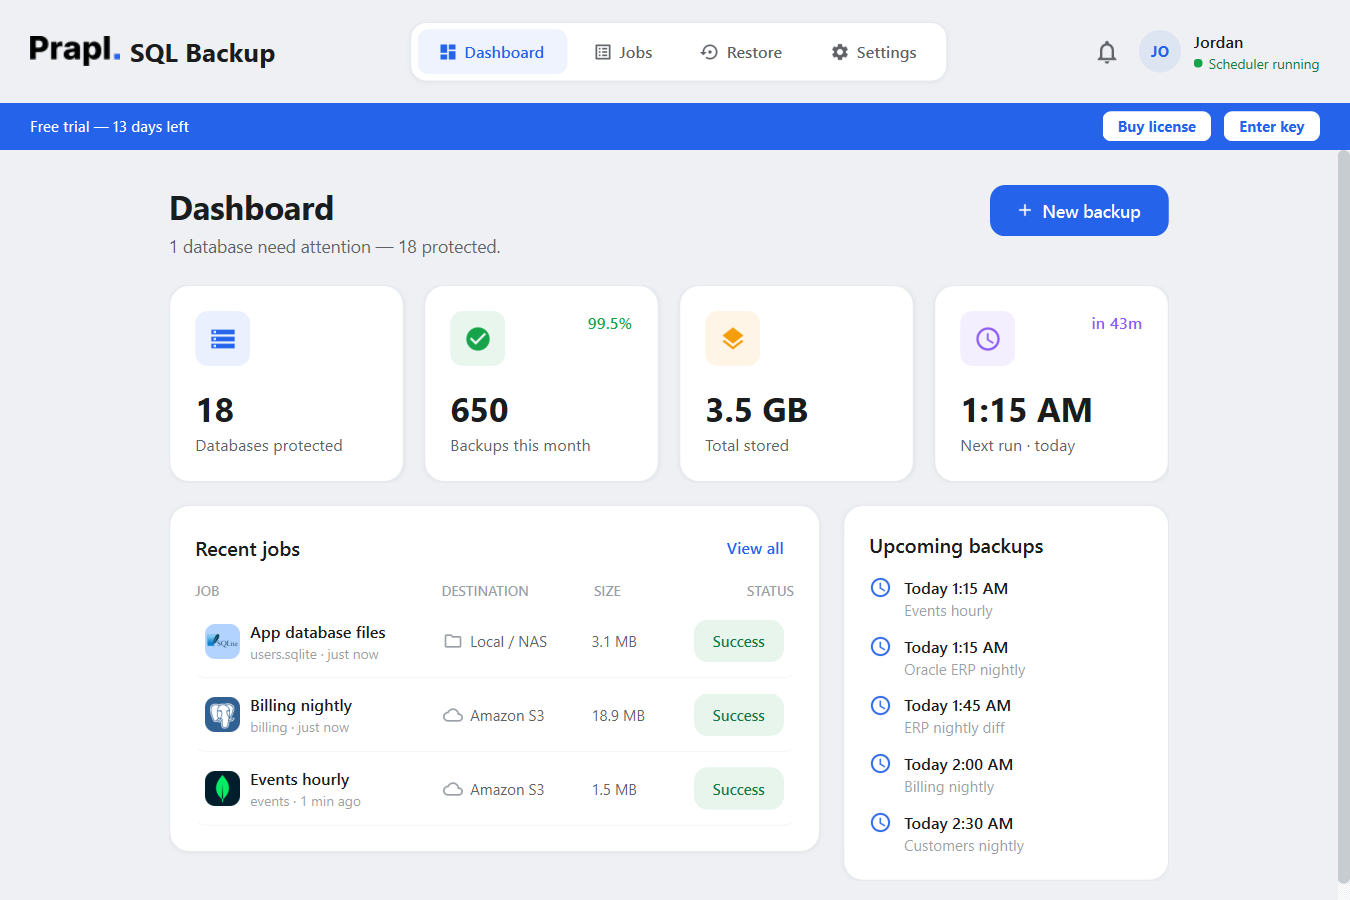
During the trial a blue strip shows the days left. Everything else works exactly as in the full version.
You'll land on the Dashboard. It's empty for now — the blue + New backup button is the only thing you need on day one (see Your first backup).
What happens when the trial ends
The strip turns amber at 5 days and red at 2 days to remind you. When the 15 days are up, scheduled backups pause and you can't create or run backup jobs until a licence key is entered — but nothing you already have is lost: your backup history and the Restore screen keep working, so you can always get your data back. Enter a key and everything resumes exactly where it left off.
Entering your licence key
After purchase, your licence key arrives by email. It looks like PRPL-XXXX-XXXX-XXXX.
- Open the app and go to Settings → Account & license (or click Enter key on the trial strip).
- Click Enter license key, paste the key — upper or lower case, spaces don't matter — and click Activate.
- You'll see Activated ✓. The trial strip disappears and Settings now shows your key (partly masked), the date it's valid until and how many devices it covers.
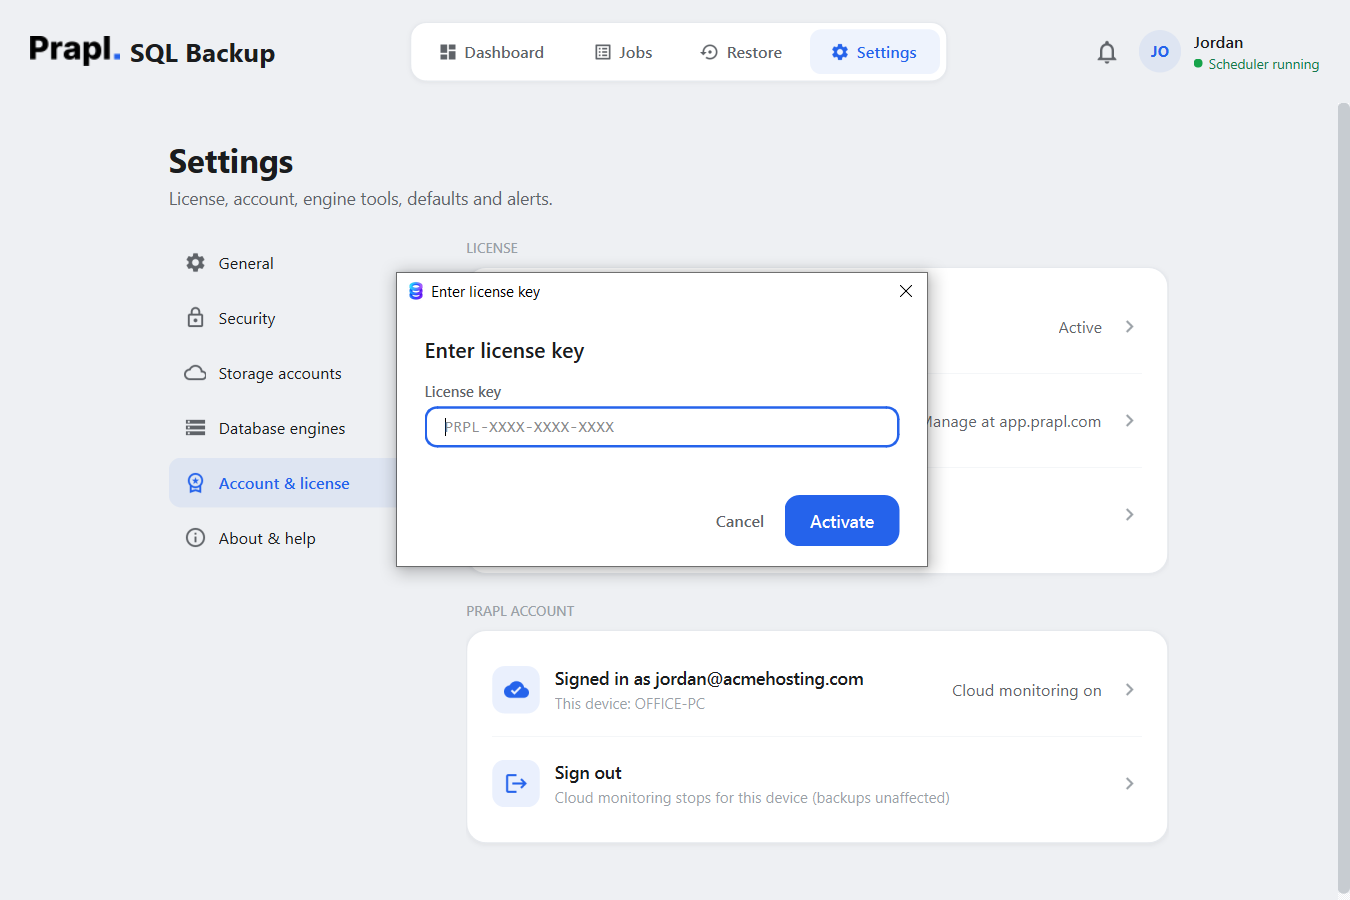
Paste the key, click Activate — done.
Moving your licence to another computer
A licence covers a fixed number of computers ("seats"). To move one: on the old PC open Settings → Account & license and click Deactivate this device — the seat is freed straight away. Then enter the key on the new PC. Uninstalling the app also frees its seat automatically, so you rarely need to think about this.
Good to know
- The app confirms the licence with our server in the background, once a day. No internet for a while? It keeps working for 7 days offline before asking to reconnect.
- The app never sends your database contents, backups or passwords anywhere — only the licence key, a random install ID, the PC name and the app version, so we can tell your computers apart.
- Renewal reminders appear in the notification bell 14, 7, 3 and 1 days before a licence expires.
Your first backup in five minutes
Setting up a backup is answering four questions: Which database? How do I reach it? Where should backups go? How often? The app walks you through them one at a time in the New Backup wizard, where every step is shown with a screenshot below.
- Click + New backup on the Dashboard.
- Pick your database type, enter the connection details and click Test & list databases. Tick the databases you want protected.
- Choose where the backups should go — for a first try, Local / NAS and a folder on your PC is perfect.
- Give the backup a name, leave the schedule at Daily, 2:00 AM, keep the last 7, and click Save & run now.
That's it. Watch the first backup run live on the Dashboard; from now on the app takes one every night without being reminded, cleans up old copies itself, and can tell you if anything ever goes wrong.
Dashboard — your backup health at a glance
The Dashboard is the first screen you see. Its job is to answer one question instantly: "is my data safe right now?" The line under the title says so in words — for example "1 database needs attention — 18 protected".
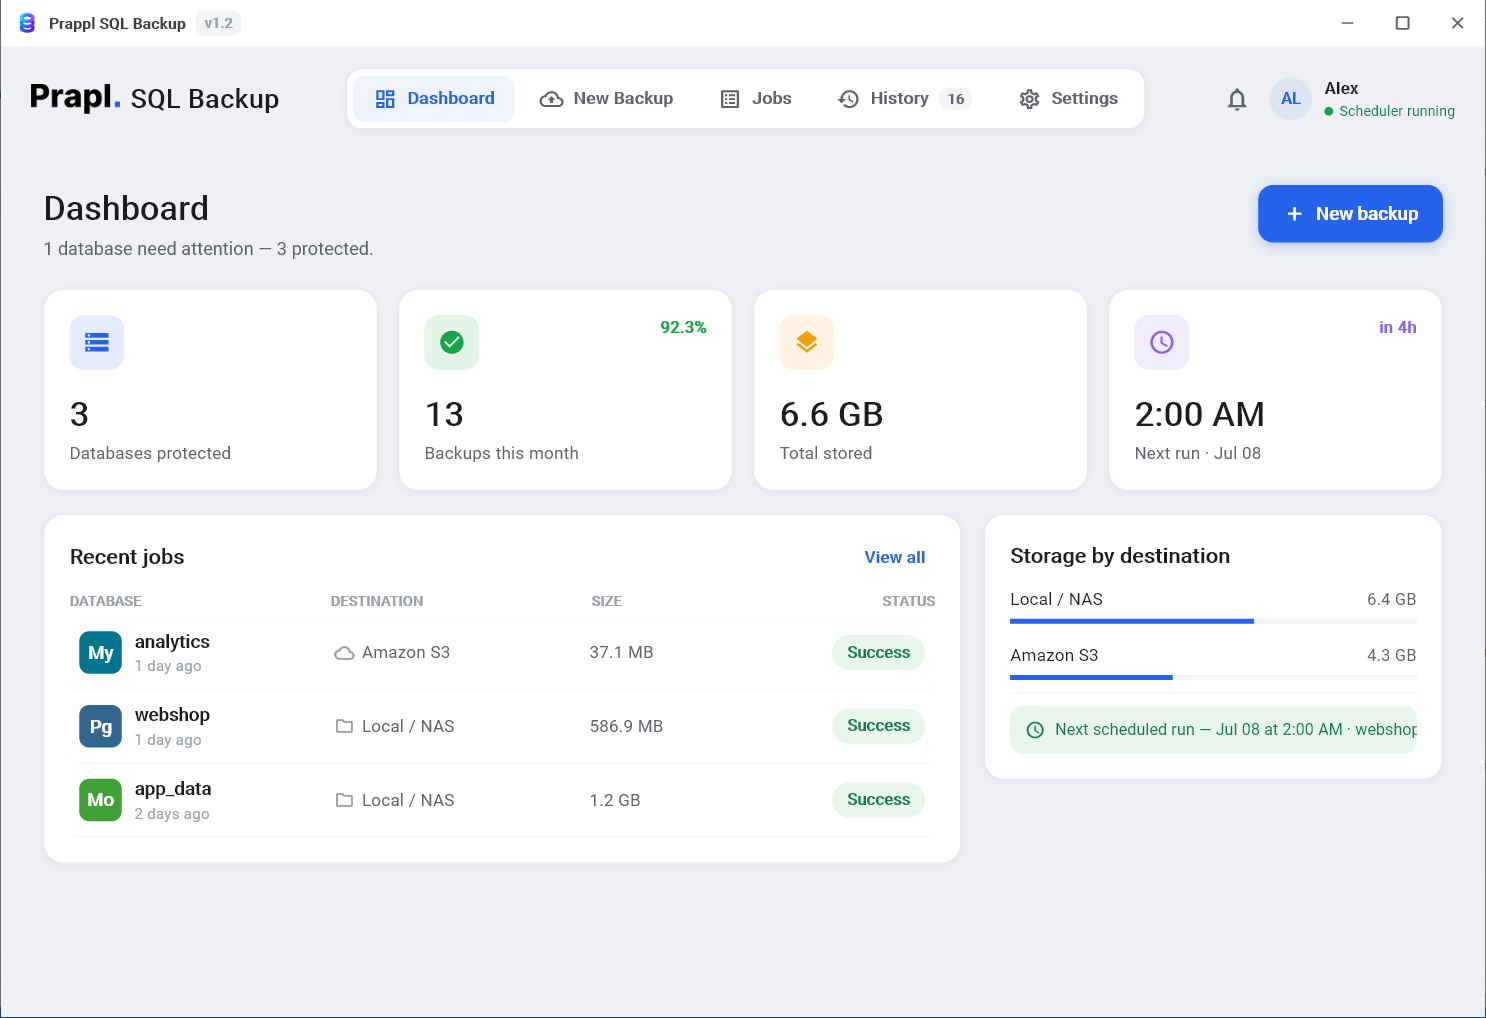
The Dashboard: four summary cards, the latest runs, and what's coming up next.
- Databases protected — how many databases currently have a backup job.
- Backups this month — how many ran, with the success rate in green. 100% means every backup succeeded; anything lower deserves a look in History.
- Total stored — how much backup data you're keeping across all destinations.
- Next run — when the next automatic backup happens, and how soon ("in 48m").
- Recent jobs — the last three runs with destination, size and a green Success or red Failed badge. Click a row for the full details of that run, or View all for the complete history.
- Upcoming backups — the next five scheduled runs. A job with no schedule is flagged here in amber ("No schedule — runs only manually").
While a backup is running
A Running now card appears at the top with a live progress bar for each backup in progress: which database, what the app is doing right now ("Compressing…", "Encrypting…", "Uploading to Wasabi…"), the percentage, size, transfer speed and time elapsed. You can keep using the app — or close the window — while it runs.
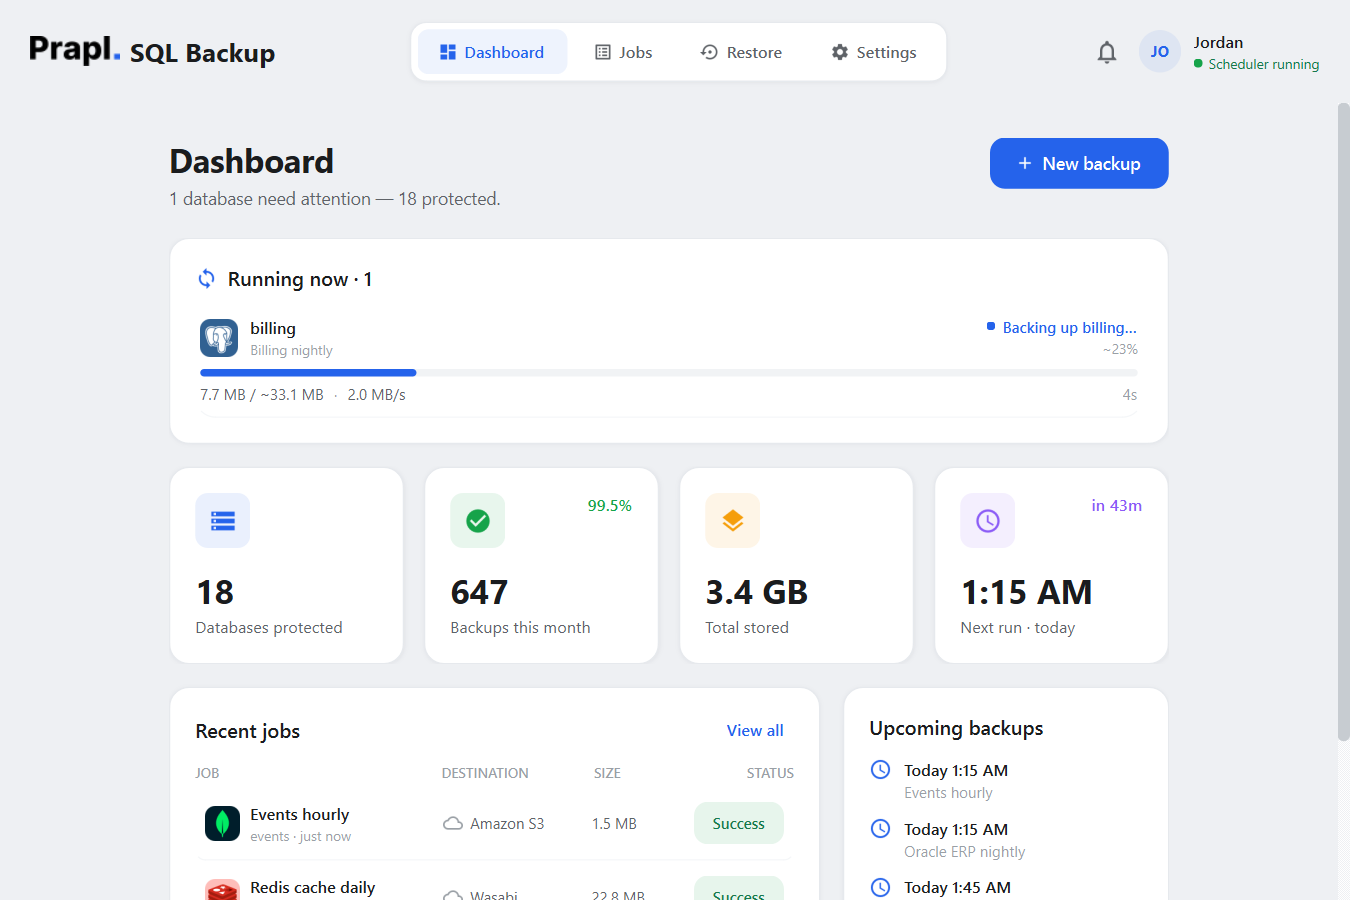
A backup in progress: phase, progress, speed and elapsed time update every second.
New Backup wizard — four questions, one backup plan
Click + New backup (on the Dashboard or the Jobs screen) and the app walks you through four steps: 1 Database · 2 Connection · 3 Destination · 4 Plan. You can click any step number to go back, and nothing is saved until you press Save job at the end. The same wizard opens, pre-filled, whenever you edit a job later.
Step 1 — Which database engine?
Pick the kind of database you want to protect. Not sure which one you have? It's usually written in your website's or application's settings screen, or ask whoever set it up. Each engine is explained in The ten databases below.
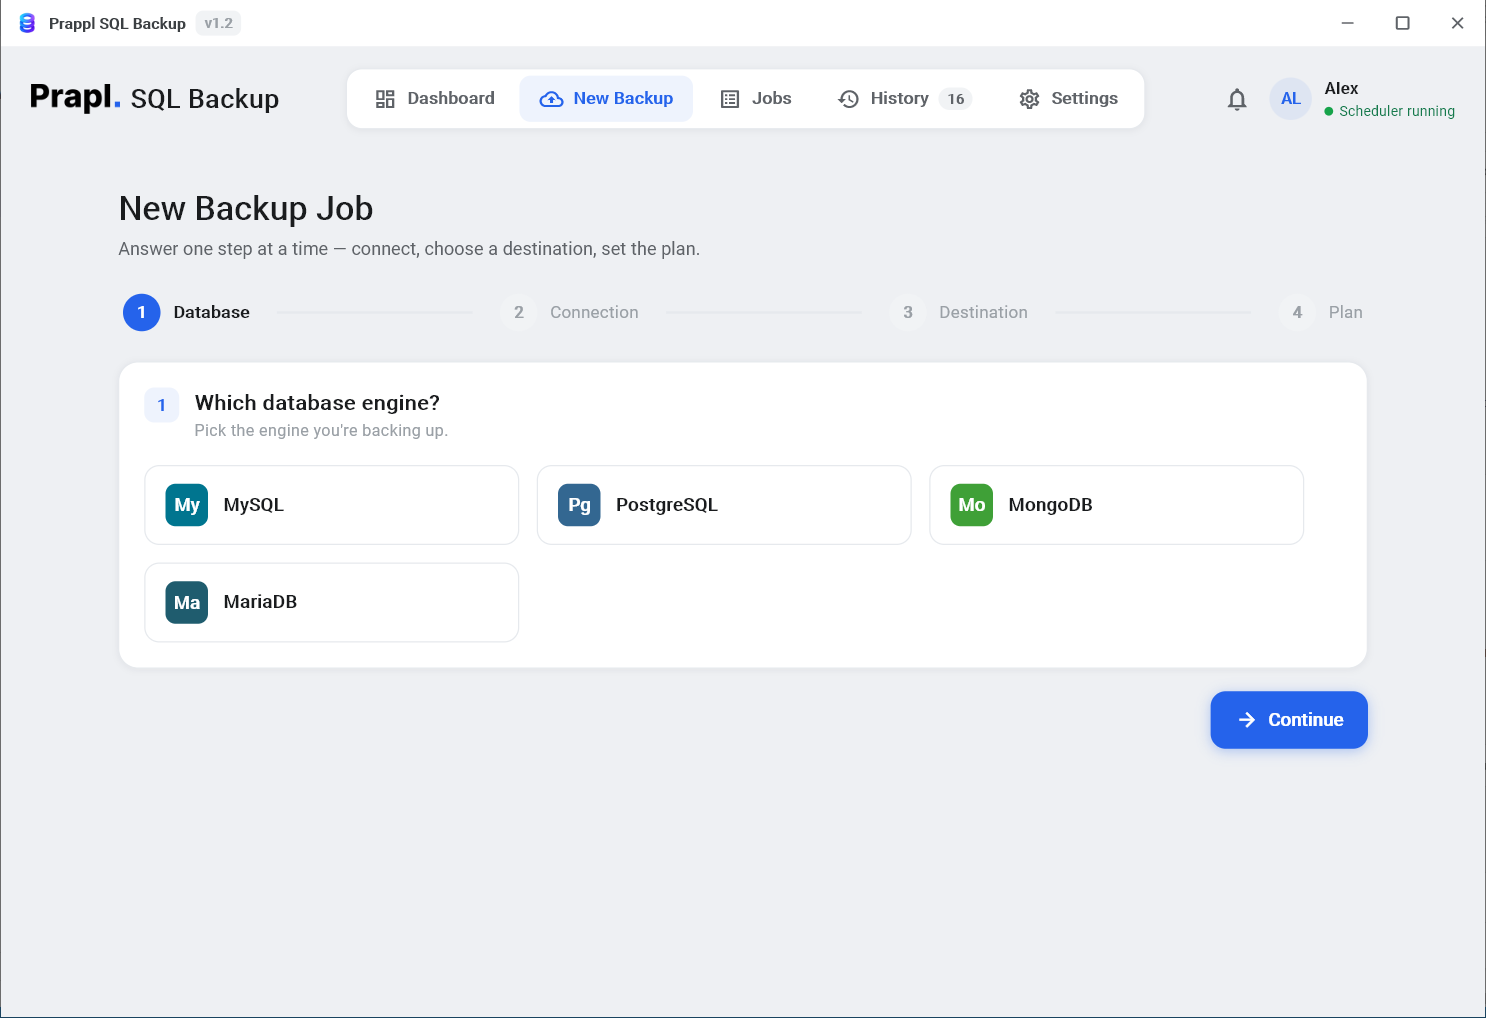
Step 1: choose your database type, then click Continue.
Step 2 — How should we connect?
Enter the address of your database server (Host), the Port (already filled in with the usual one), the Username and Password. These are the same details your website or application uses. Optionally give the connection a name ("Production", "Office server") so you recognise it later.
Got a connection string instead — one long address starting with something like postgresql:// or mongodb+srv://? Click Connection string at the top of the form and paste it; the app works everything out from there. Hosting services such as Neon, Supabase, Amazon RDS and MongoDB Atlas hand these out.
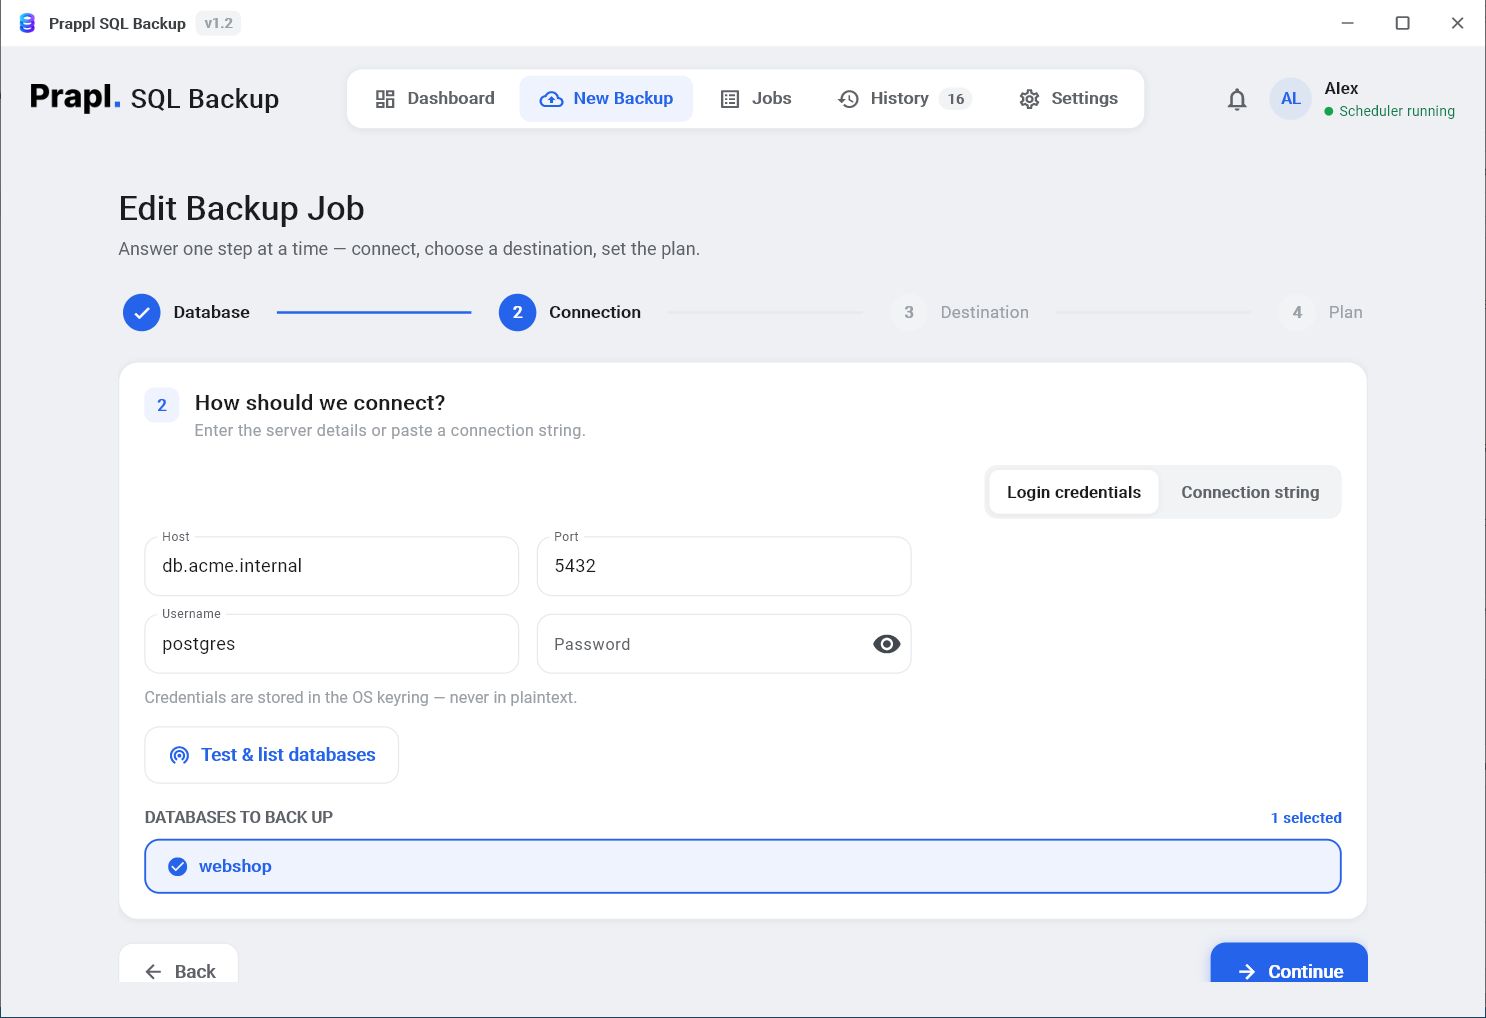
Step 2: fill in the details, click "Test & list databases", then tick what to back up.
Click Test & list databases. The app checks it can reach the server and, a second later, lists every database it found with its size. Tick the ones you want backed up — all of them are pre-selected, except the server's built-in maintenance database, which is normally empty and best left alone. If the list can't be loaded for some reason, just type the database name in the box that appears instead.
If the test fails you'll see the reason in plain words (wrong password, server not reachable, and so on) and a Test again button. Your password is kept in Windows' own secure vault (Credential Manager), never in a plain file.
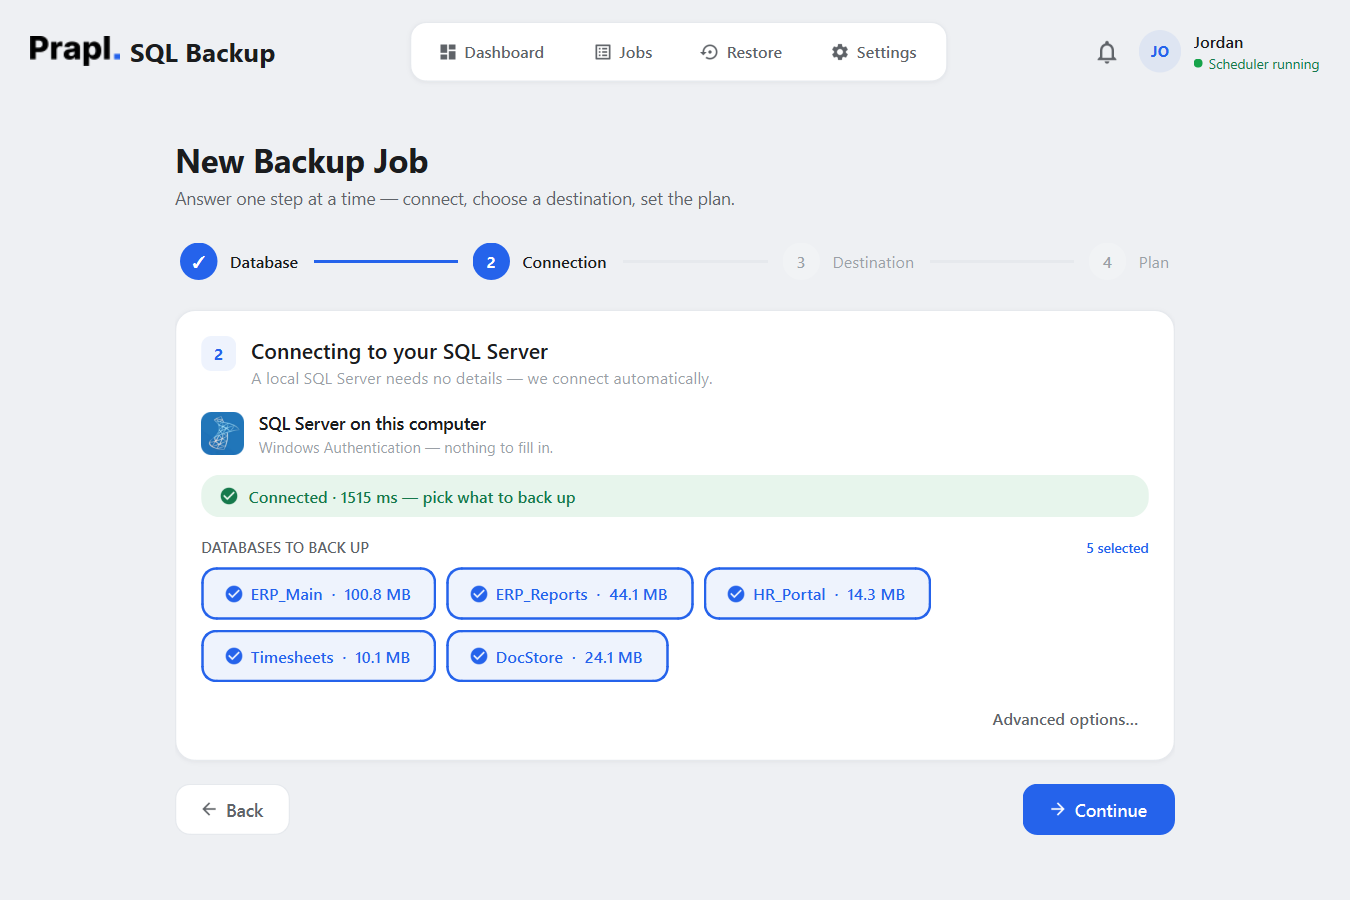
Step 2 for SQL Server: no form — the app connects by itself using Windows Authentication.
Step 3 — Where should backups go?
Choose a destination tile and fill in its details. For a folder on this PC, an external drive or a network drive, pick Local / NAS and click Browse…. For OneDrive, click Sign in with Microsoft — your browser opens once and that's it. For cloud buckets and servers, enter the details your provider gave you. Every destination and its fields are listed in Where backups can go.
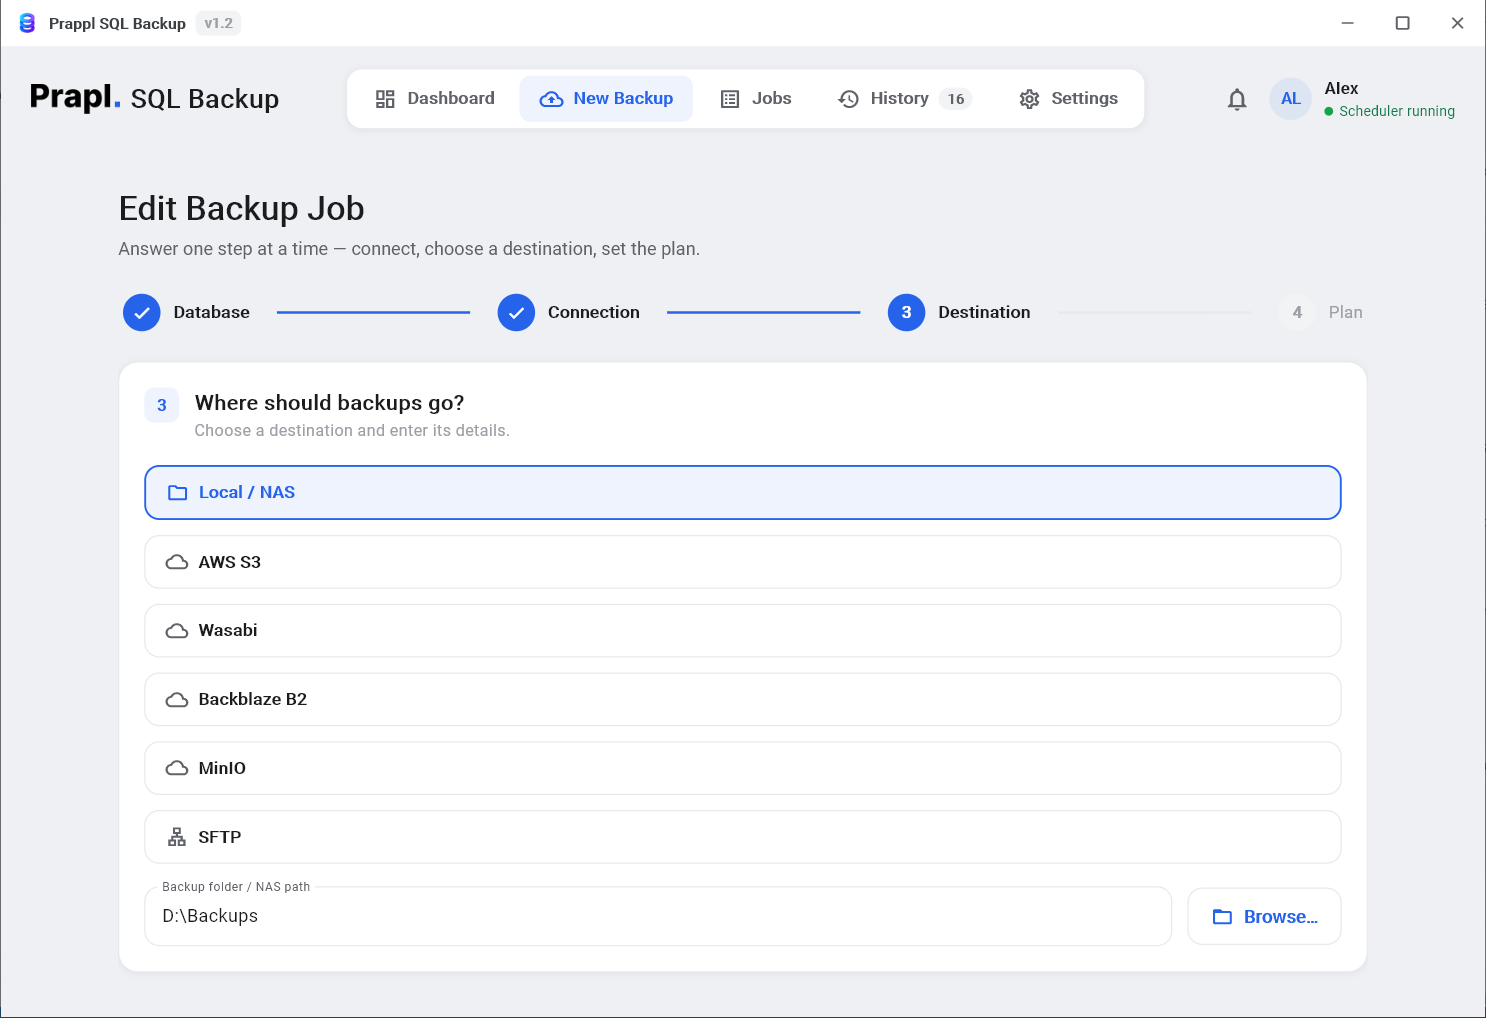
Step 3: pick a destination. For a local folder, just click Browse and choose it.
Once you've saved a destination, it appears as a card under the tile next time ("Your saved servers", "Your OneDrive accounts") so you can reuse it with one click.
Keeping a second copy
Click Add a secondary backup (optional) to send every backup to a second place as well — the classic combination is a local folder for quick restores plus a cloud bucket for disasters. The first destination stays the "primary": a run only counts as failed if the backup can't be stored there; a missed secondary copy is simply flagged in History.
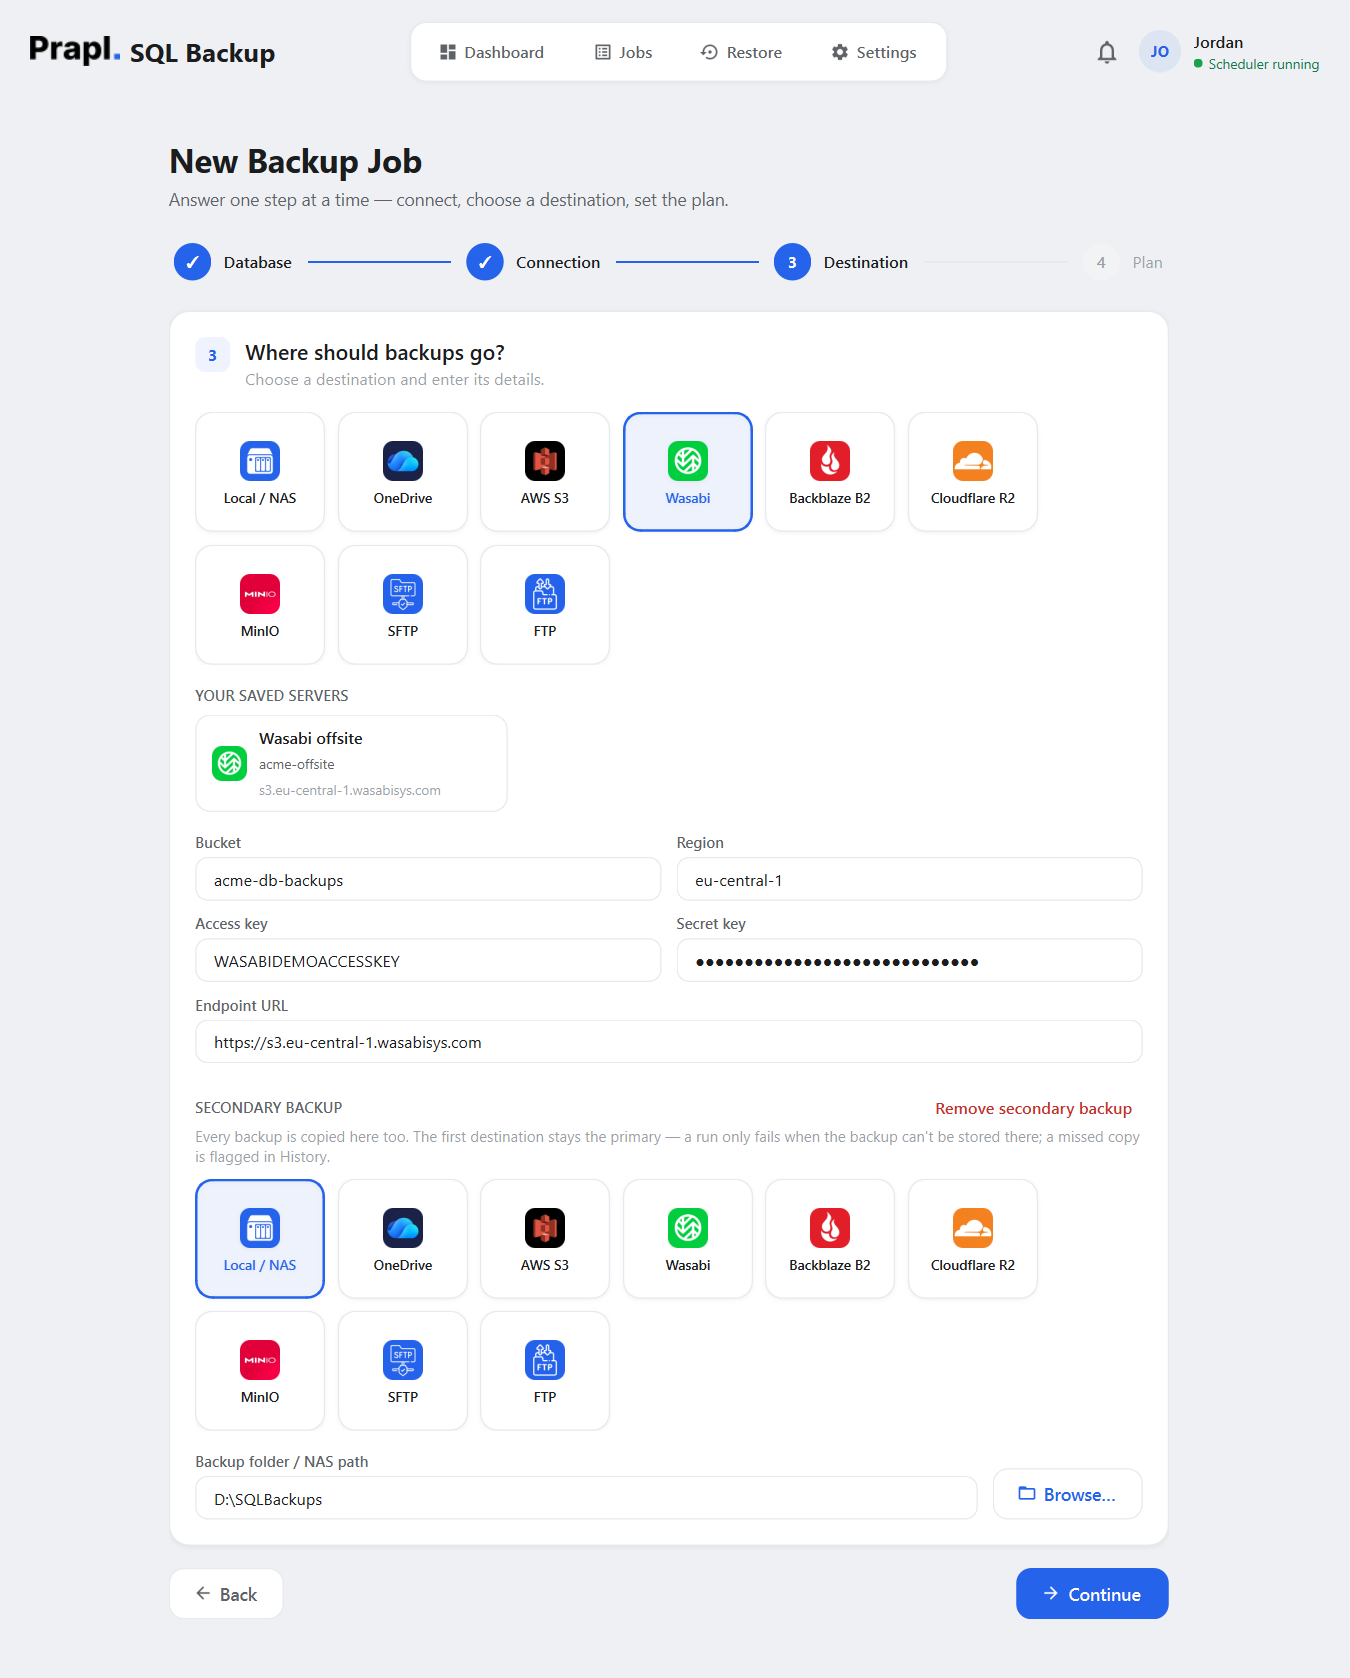
A cloud bucket as destination (bucket, region, keys, endpoint) with a secondary copy added underneath.
Step 4 — What's the backup plan?
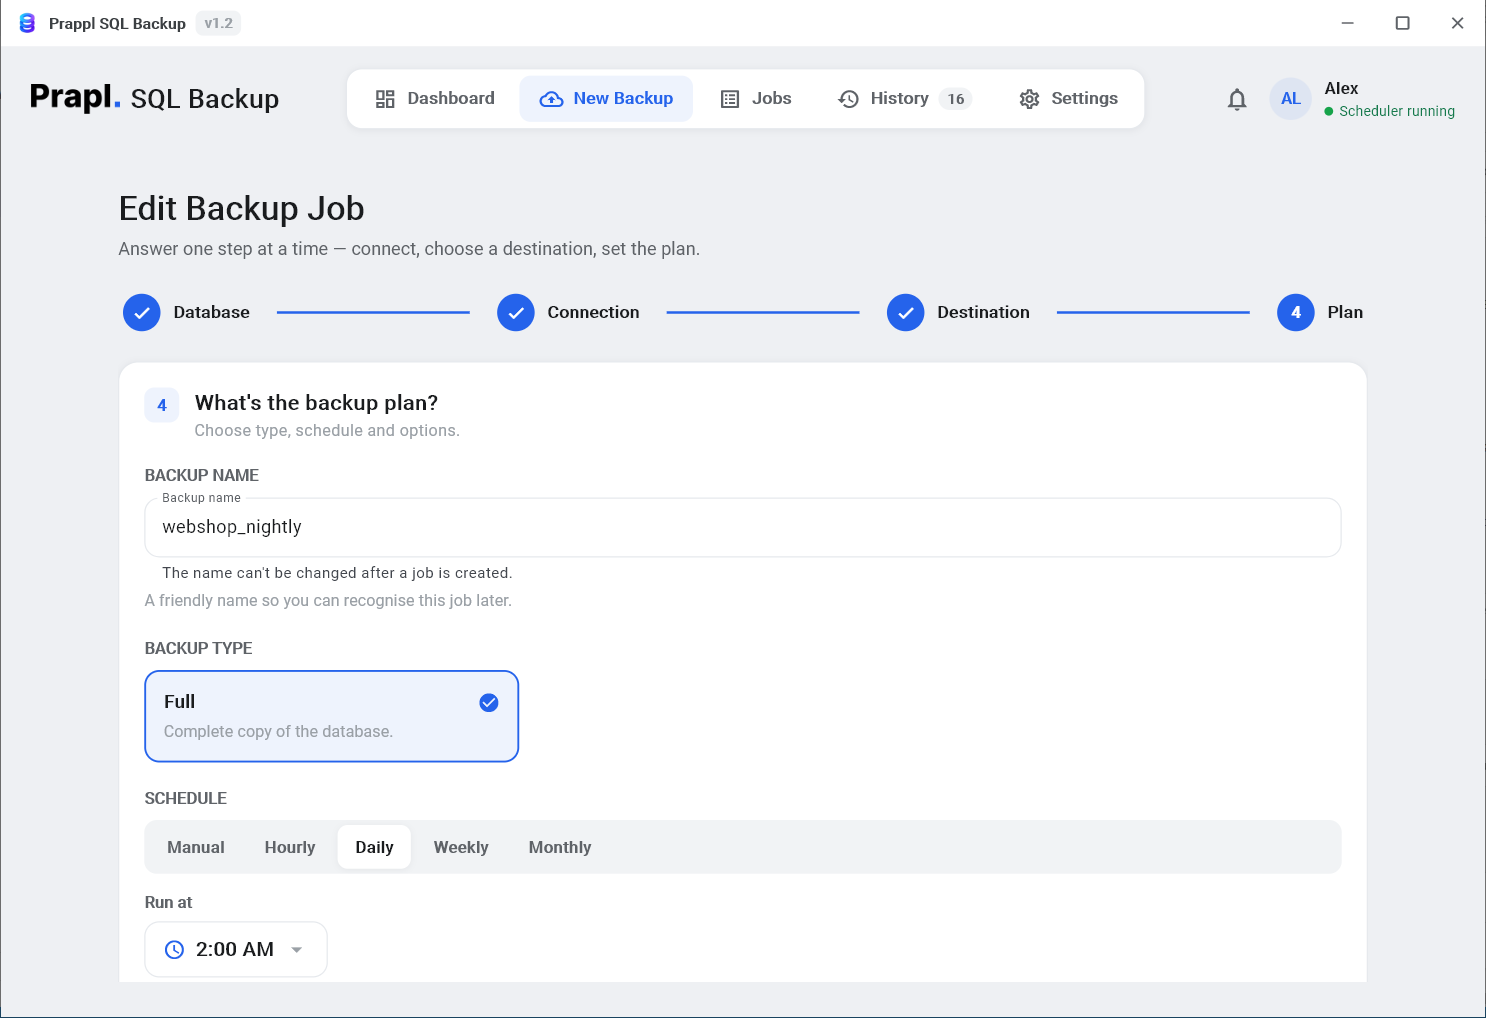
Step 4: name it, choose the type, switch on the schedules you want, protect it, save it.
From top to bottom:
- Backup name — anything you'll recognise, e.g. "Web shop nightly". (It can't be renamed later, but everything else can.)
- Backup type — Full is a complete copy every time and is the right choice for almost everyone. Some engines also offer Incremental, Differential or Transaction log; see Full, incremental, differential.
- Backup schedule — four rows, Daily / Weekly / Monthly / Yearly, each with a switch and a keep last N counter. Switch on the ones you want; the most frequent one that's on decides how often the backup runs, and each row's number says how many of those copies to keep. Weekly lets you pick the weekday, monthly the day of the month, yearly the date. Everything switched off means manual — the job only runs when you click Run. Details in Schedules & retention.
- Run at — the time of day, 2:00 AM by default. Click it to pick another time; the middle of the night is usually best.
- Password protection — None, ZIP with password (opens in any zip program) or Advanced: AES-256 (strongest, opens only in this app). See Compression & encryption.
- Compress (gzip) — on by default; makes files several times smaller.
- Checksum verify — on by default; the app double-checks every file after writing it.
- A summary line at the bottom reads back the plan in a sentence, e.g. "Backs up daily at 2:00 AM — keeps 7 daily, 4 weekly (Mon) copies (full)."
Finish with Save & run now to take the first backup immediately (recommended — you'll see it run on the Dashboard), or Save job to let the schedule handle it.
Jobs — manage your backup plans
Every backup plan you create is called a job, and they all live on the Jobs screen. One row per job, showing the database, the schedule and backup type, the destination and how the last run went — a green Success badge, a red Failed badge, or "Never run".
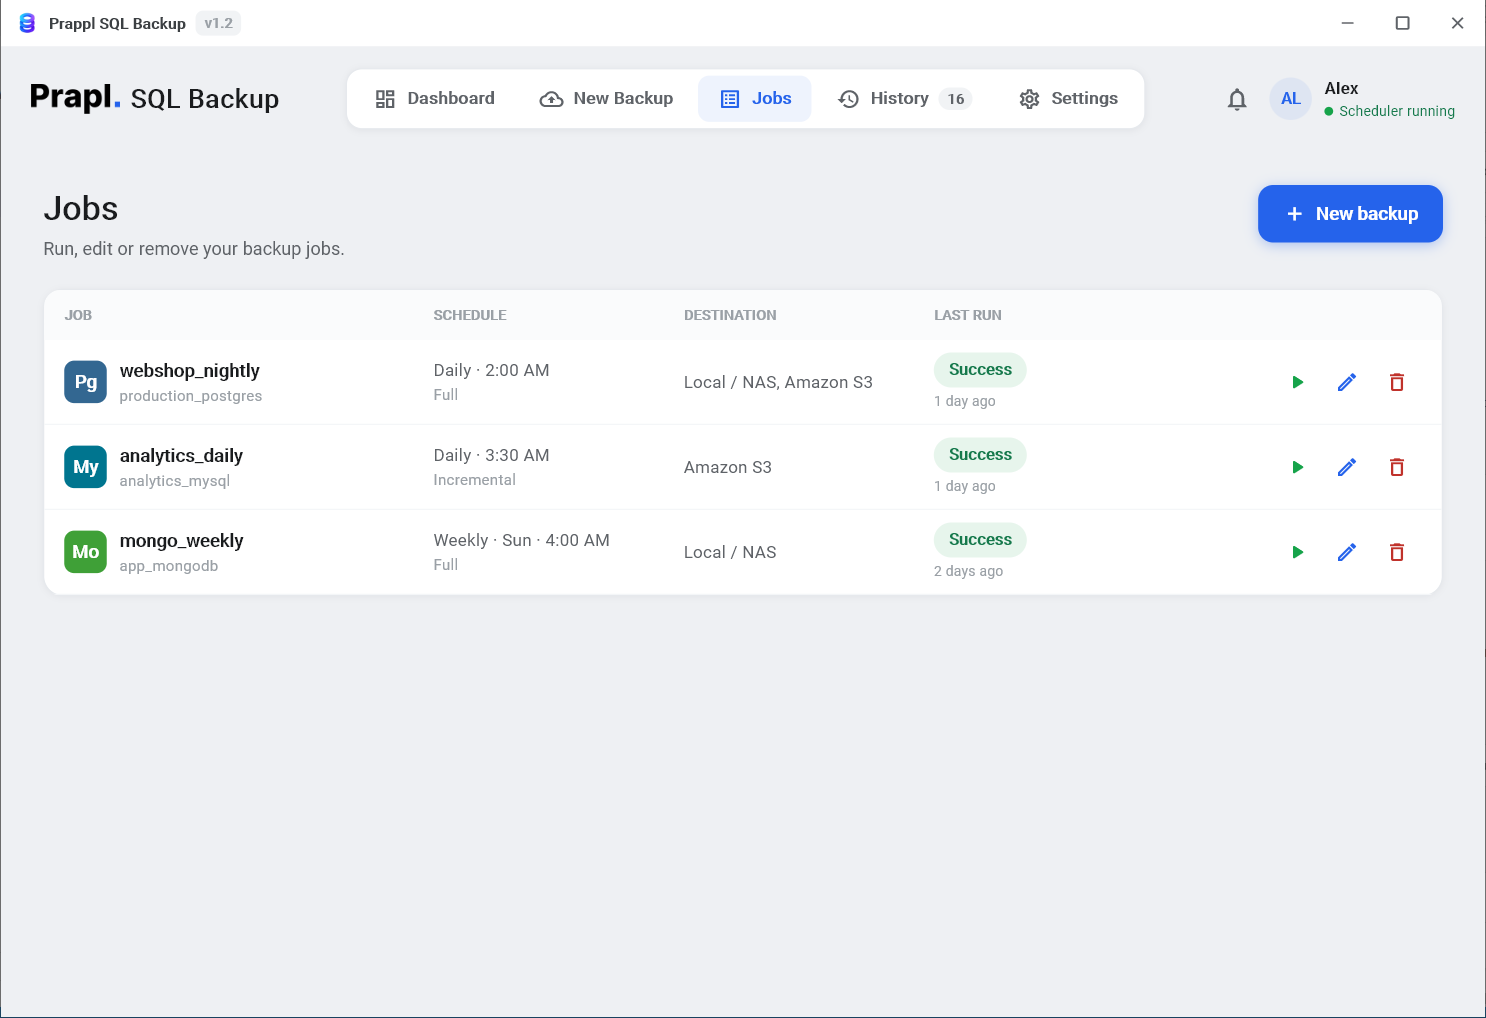
The Jobs screen — each row is one automatic backup plan, with Run, Edit and Delete on the right.
- Run now — take a backup right now, outside the schedule. Handy just before a big change to your website or app. While it runs the button turns into a spinner.
- Edit — reopens the wizard with everything filled in, so you can change the schedule, destination, protection or which databases are included.
- Delete — removes the job after a confirmation. Your existing backup files are not deleted — only the plan goes away.
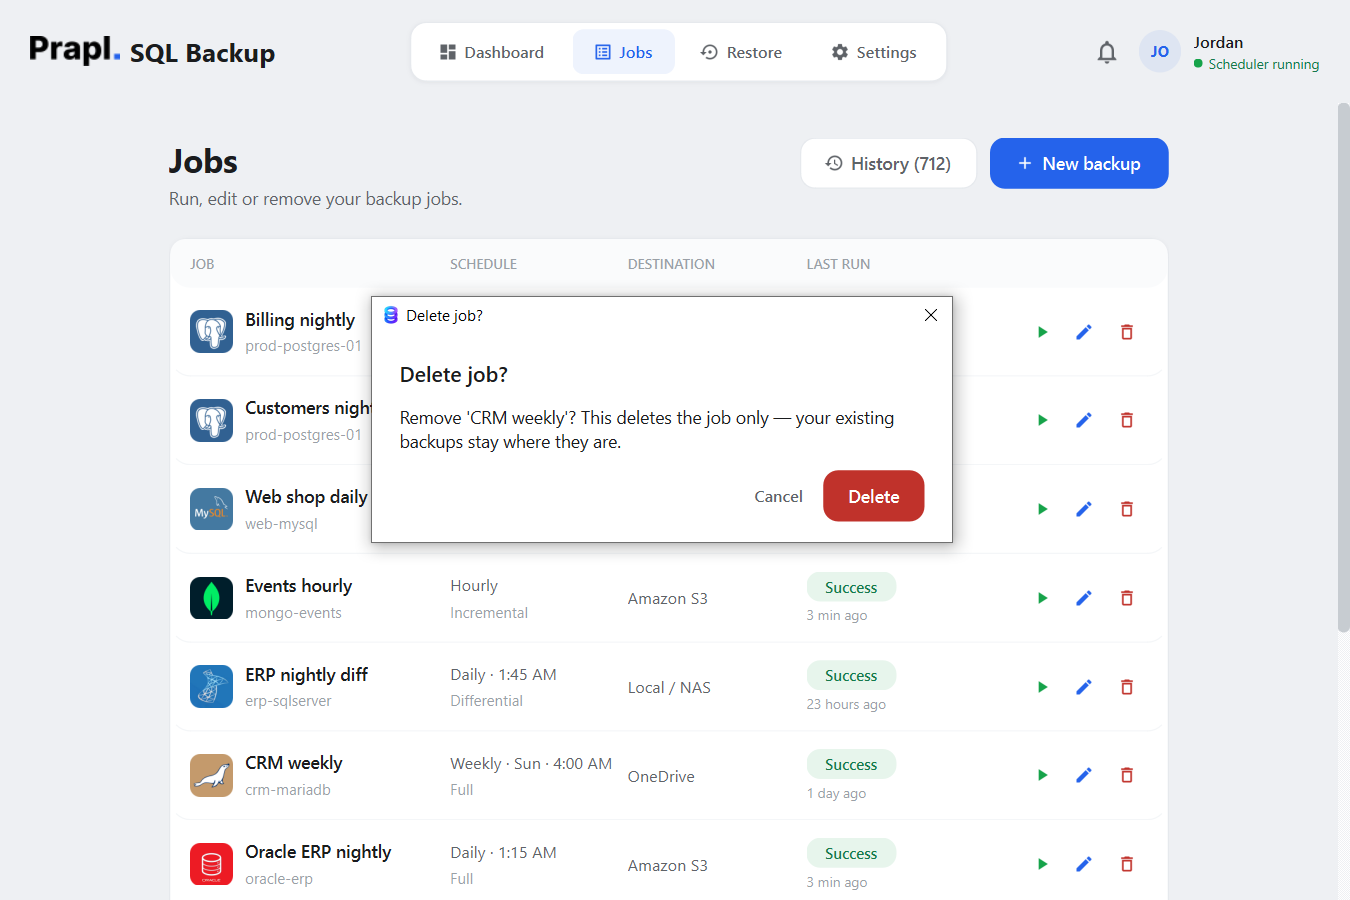
Deleting a job always asks first — and never touches the backups already stored.
The History button at the top (with the number of runs so far) opens the full backup history; + New backup starts the wizard.
Backup history — every run, black on white
History lists every backup that ever ran: which database, where it went, when it started, how big the file was, how long it took and whether it succeeded. This is your proof that backups are really happening — no more "we think the backups are running".
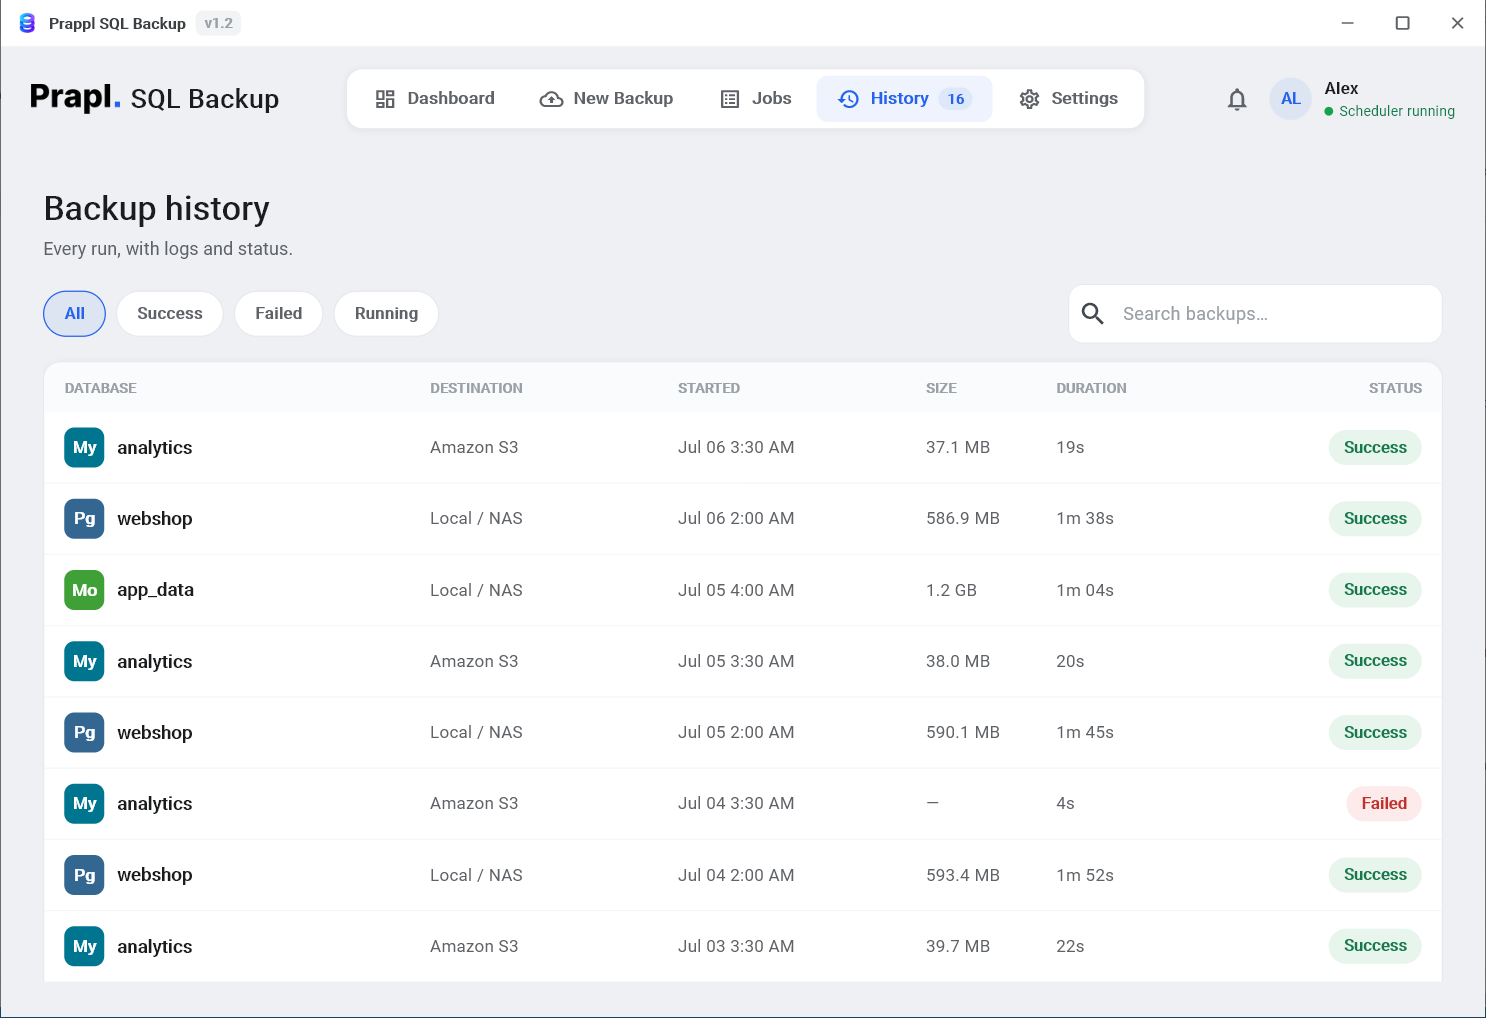
History: filter by Success / Failed / Running, narrow by date, or search by name.
- Use the All / Success / Failed / Running pills to show, for instance, only the runs that failed.
- Dates narrows the list to a period; Search backups… finds a database or job by name.
- Click any row to open the details of that run — including, for a failed run, the reason in plain words (for example "the database server couldn't be reached").
- The list shows 30 runs at a time; click Load 30 more for older ones.
Restore — bringing a database back
Backups exist for one moment: the day something goes wrong. The Restore screen brings a stored backup back to life as a working database in four steps — the app fetches the file, unlocks it, unpacks it and loads it for you. And it's built so that a test restore is completely safe.
Step 1 — Which backup do you want back?
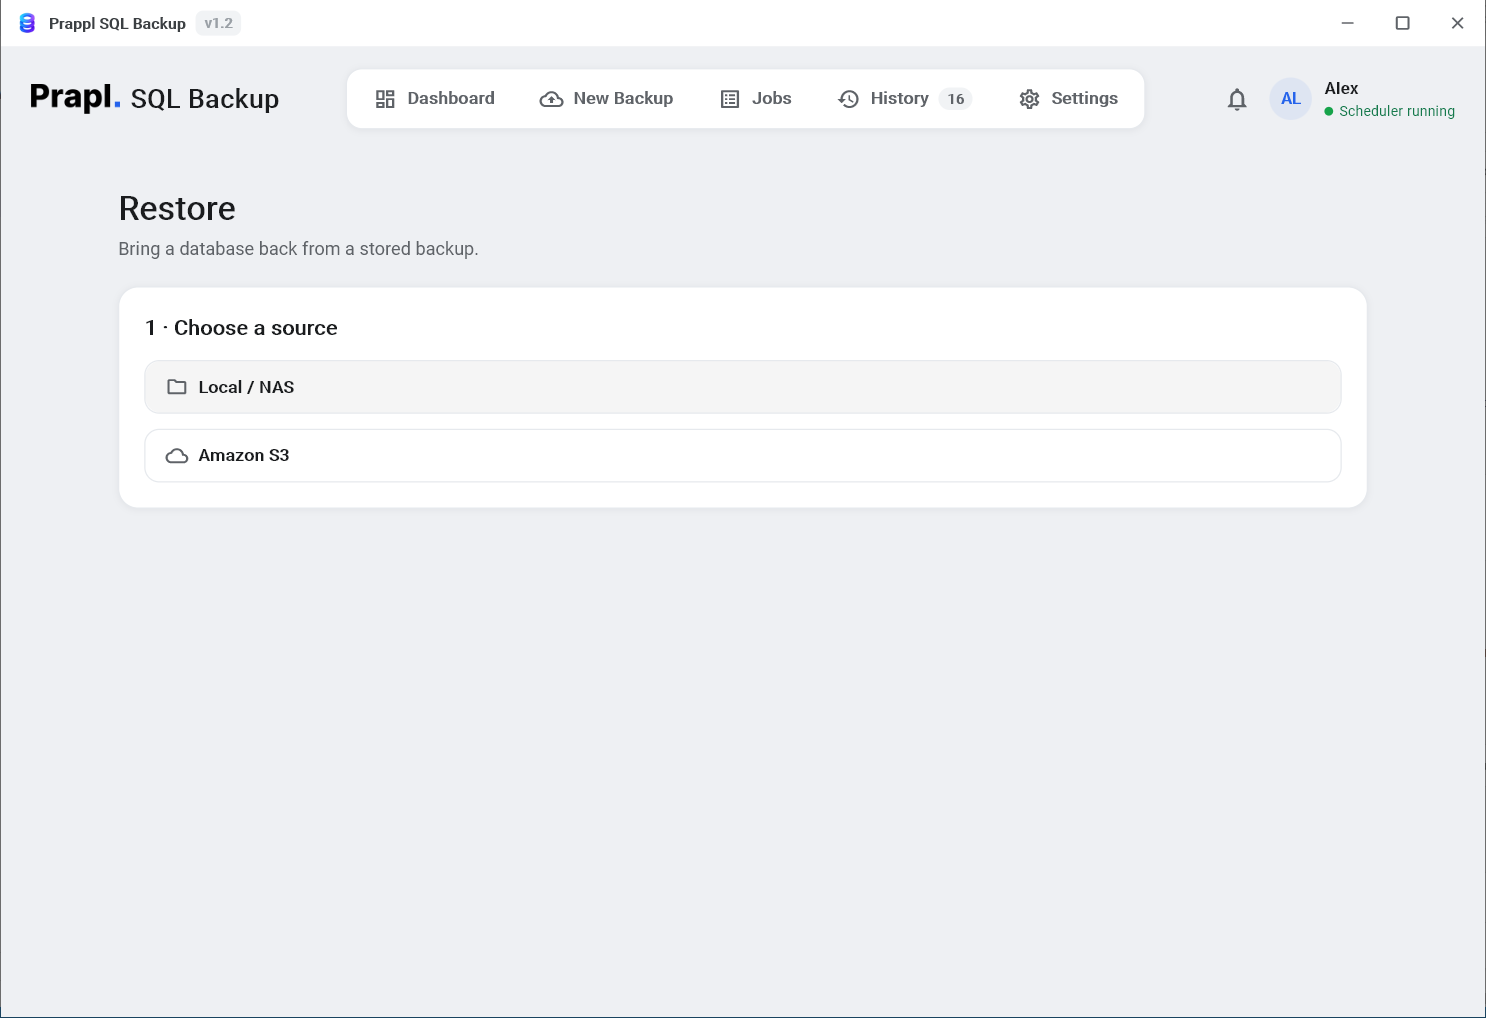
Step 1: pick the job — the app already knows where its files are stored.
Click the job whose backup you need. Each tile shows when the latest backup was taken and how many are stored. Two links at the bottom cover the unusual cases: Restore from a file on this computer… if someone sent you a backup file, and Advanced: browse storage instead to look through a destination's files directly — for backups whose job no longer exists.
Step 2 — Pick a point in time
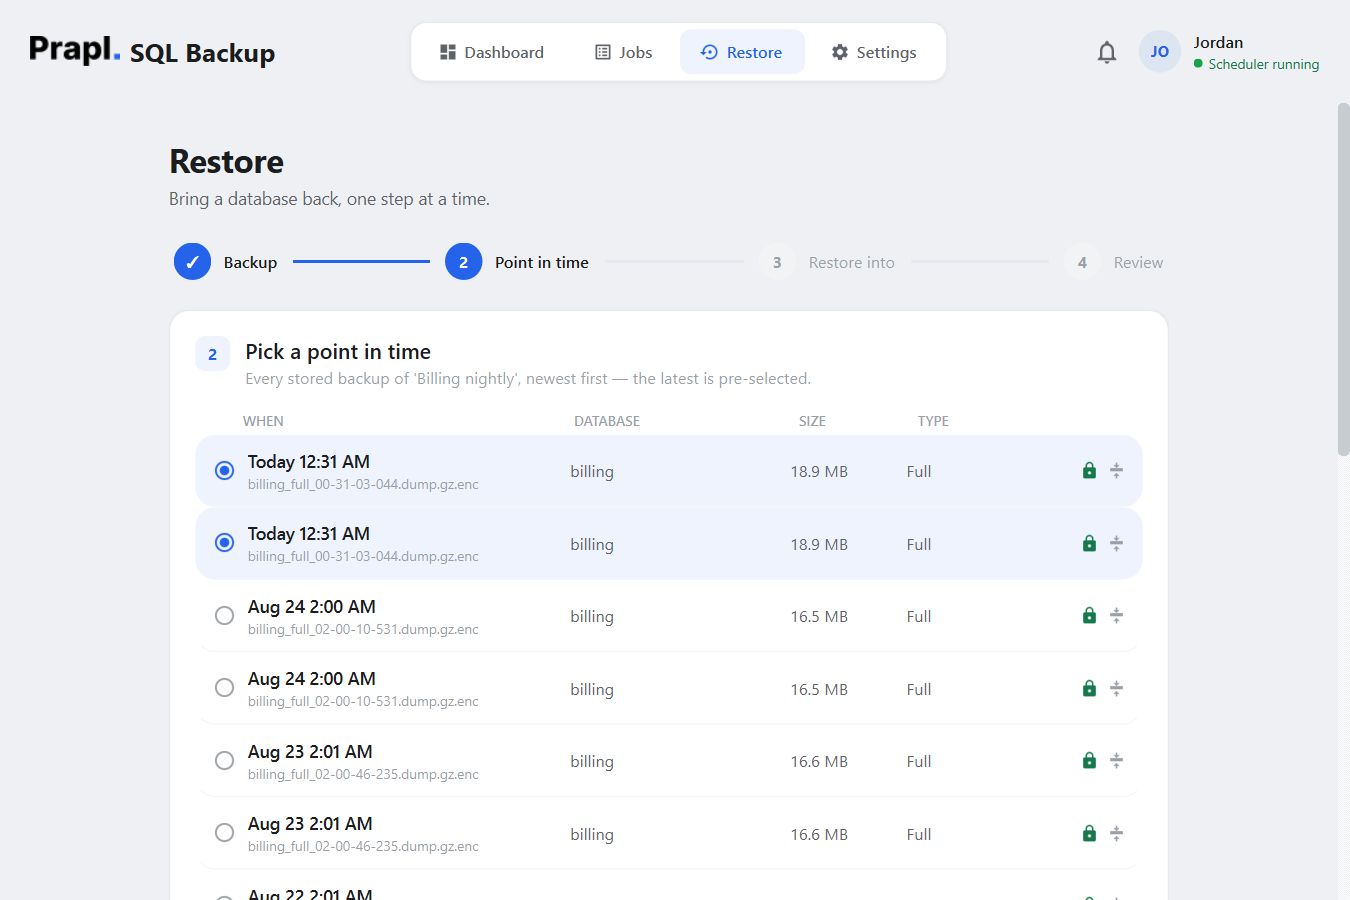
Step 2: every stored backup of that job, newest first. The latest is pre-selected.
Choose the moment you want to go back to. A lock icon means the file is encrypted and a compress icon that it's compressed — the app handles both automatically. If you pick an incremental or differential backup, a green note confirms the app will restore the whole chain (the full backup plus each change file, in order) for you.
Step 3 — What should happen with this backup?
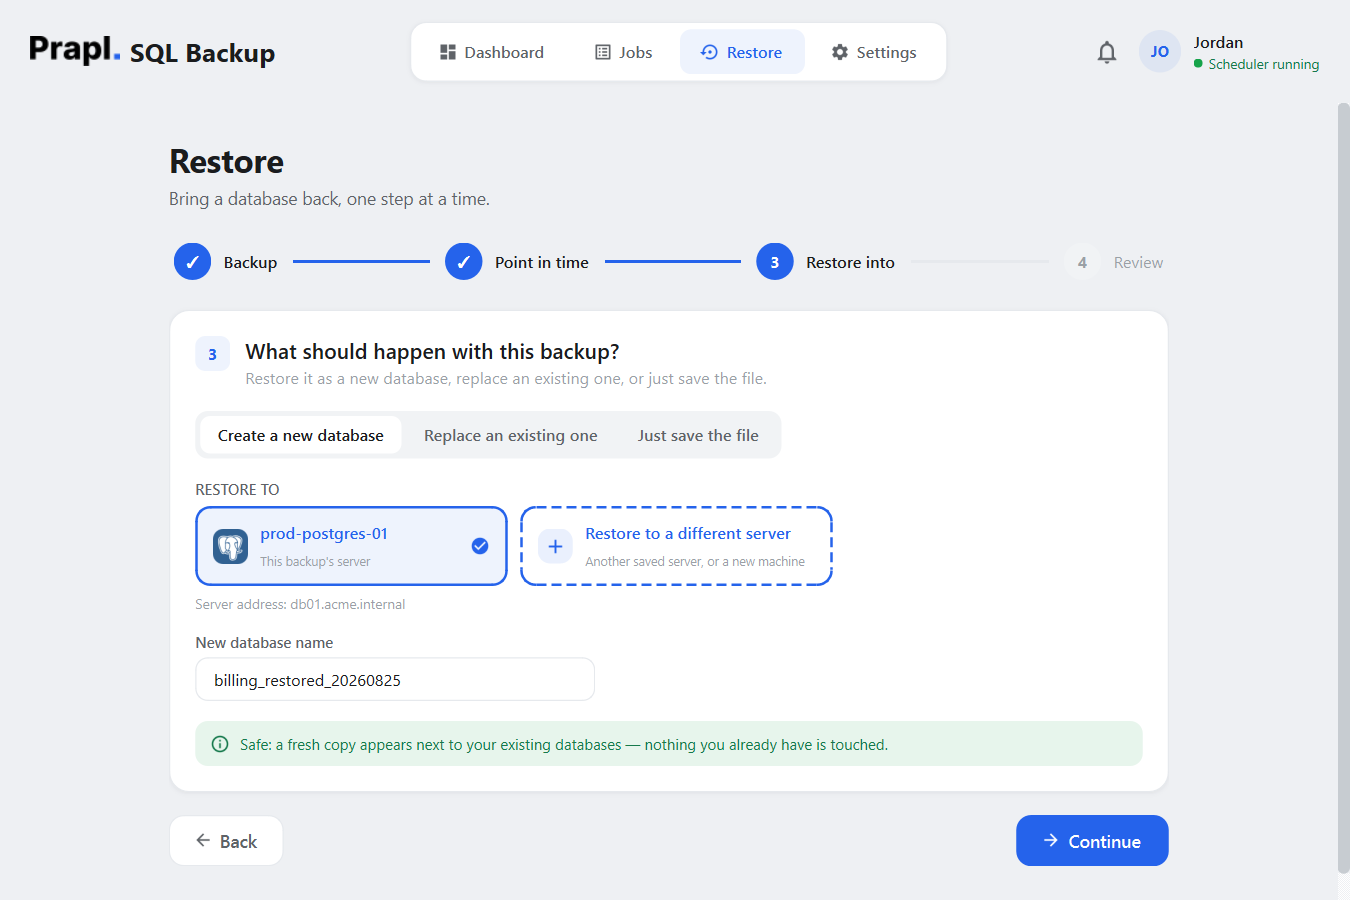
Step 3: "Create a new database" is the safe default — nothing you already have is touched.
- Create a new database (recommended) — the backup appears as a fresh copy next to your existing databases, named like
webshop_restored_20260825. Check everything is there, then switch your application over — or simply delete it again after a test. You can also restore onto a different server, for example when moving to a new machine: click the dashed tile and enter that server's details. - Replace an existing one — puts the backup's contents in place of a database that already exists. Every table in it is replaced, so the app makes you type the database's name to confirm before anything happens.
- Just save the file — you get the plain backup file, decrypted and decompressed, in a folder of your choice. Nothing is loaded into any server. Useful for inspecting a backup or handing it to someone else.
Step 4 — Review
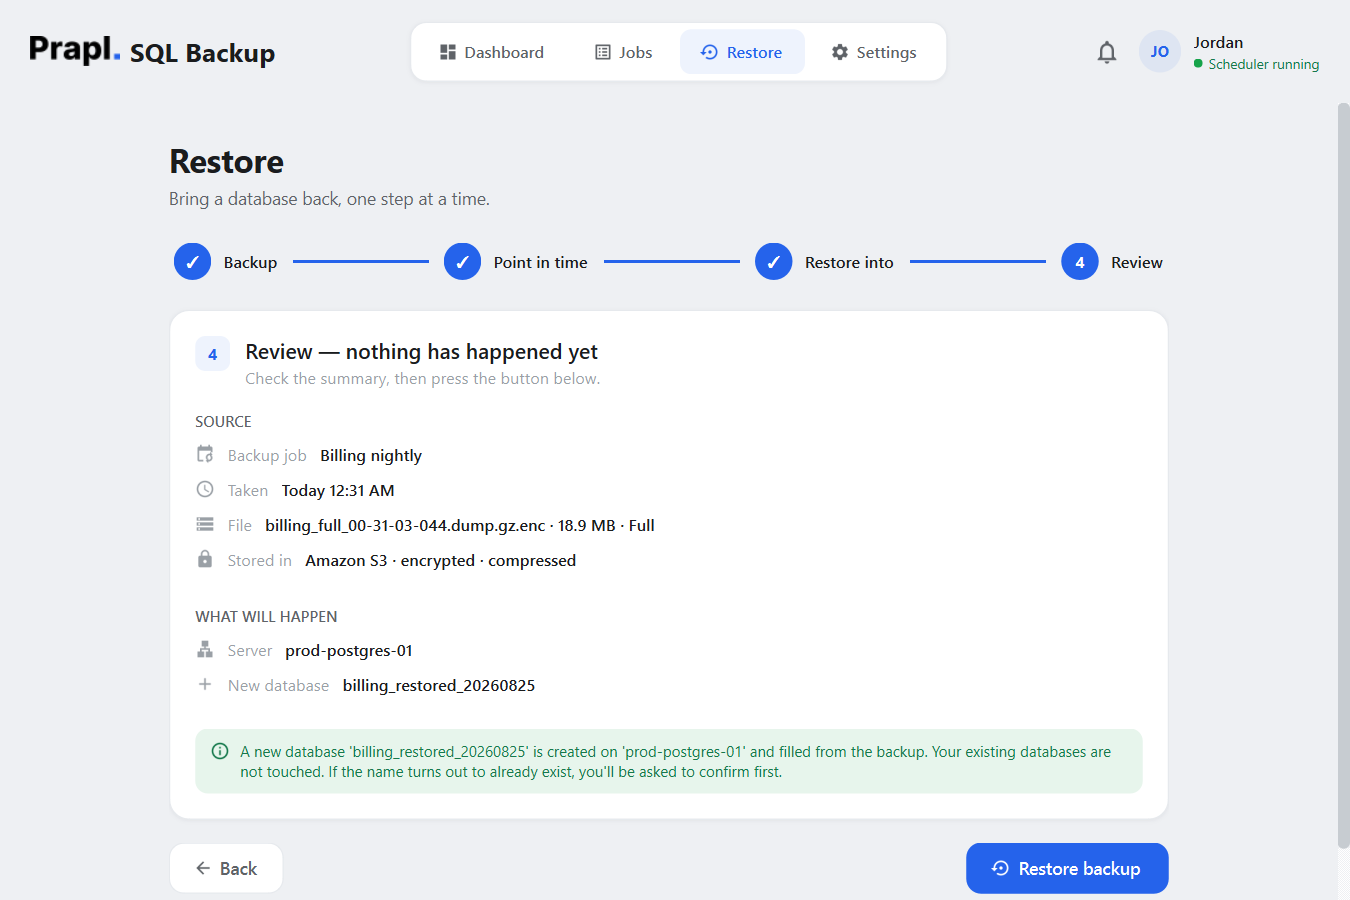
Step 4: nothing has happened yet — read the summary, then press the button.
The review page spells out the source (job, date, file, where it's stored) and exactly what will happen. Press Restore backup and watch the progress on the Dashboard. When it finishes you'll see "✓ Restore complete". Recent restores are also listed on step 1, so you can see at a glance what was restored, where, and when.
Settings — defaults, security, accounts and licence
Settings has six pages, listed down the left.
General
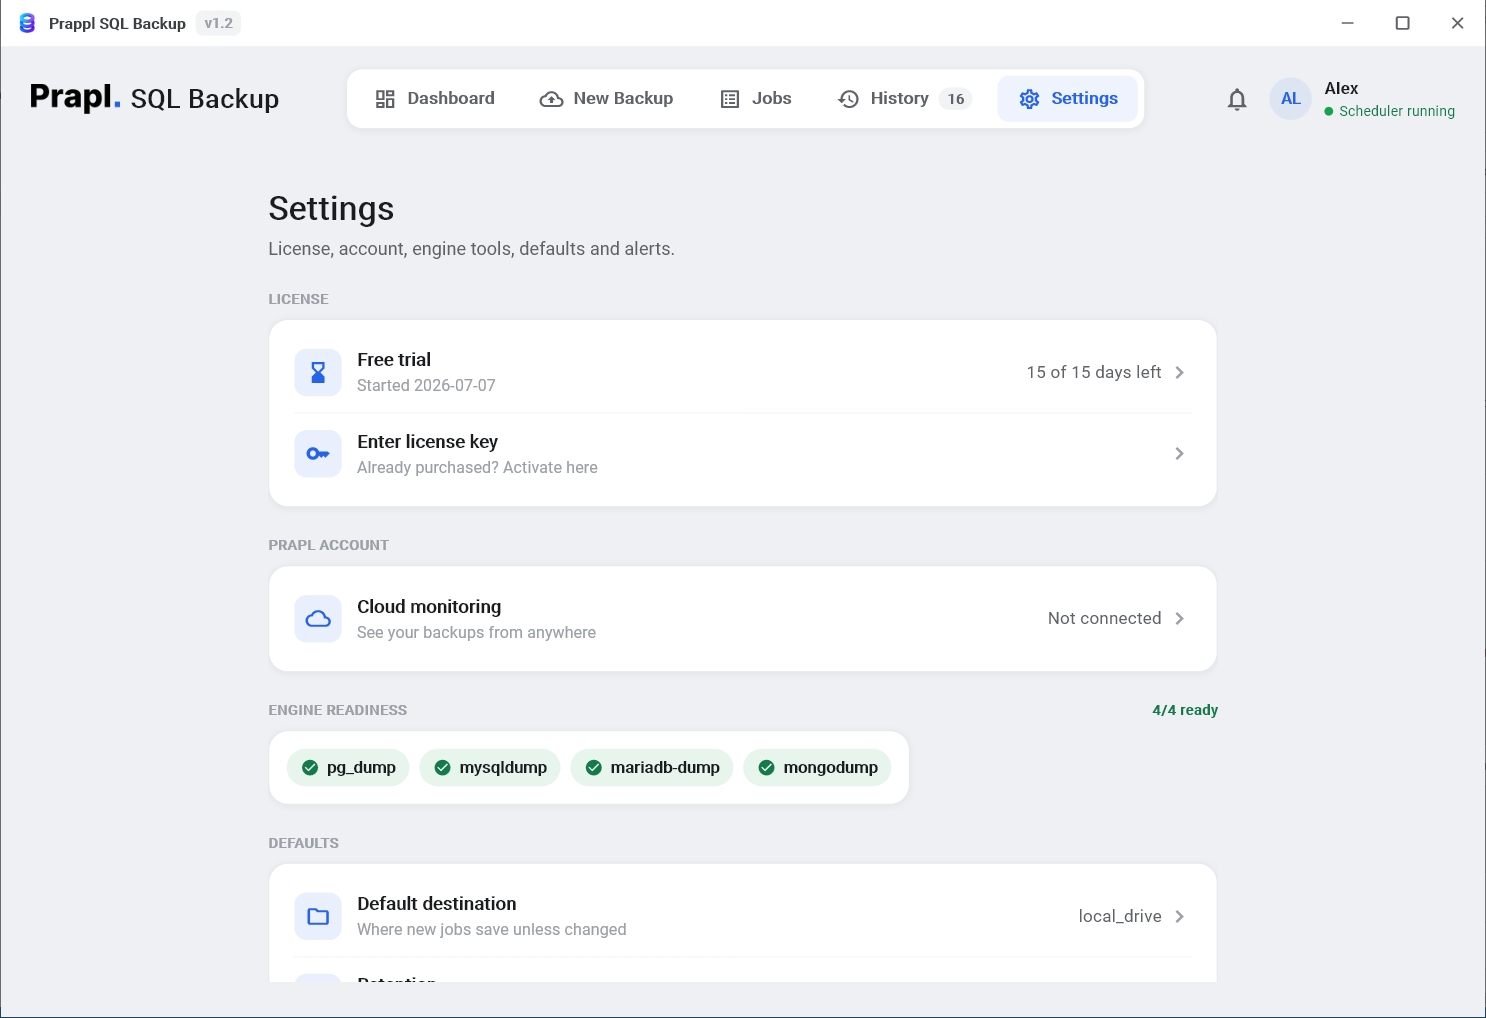
Settings › General: defaults, notifications, and start-up behaviour.
- Default destination — where new jobs save unless you change it in the wizard.
- Compress backups — whether new jobs start with compression on.
- Simultaneous backups — how many jobs may run at the same time (2 by default); the rest wait in a queue. Useful when several backups become due together, for example after the PC was off.
- Desktop notifications — show a small Windows toast when a backup finishes.
- Failure alerts — email and remote alerts for failed backups, through free cloud monitoring; see Alerts & cloud monitoring.
- Start with Windows — launch hidden in the tray at login so scheduled backups always run. (This is the same choice the installer offered.)
- Closing the window — a reminder that closing hides the app to the tray and backups keep running; use the tray icon's Exit to quit for real.
Security
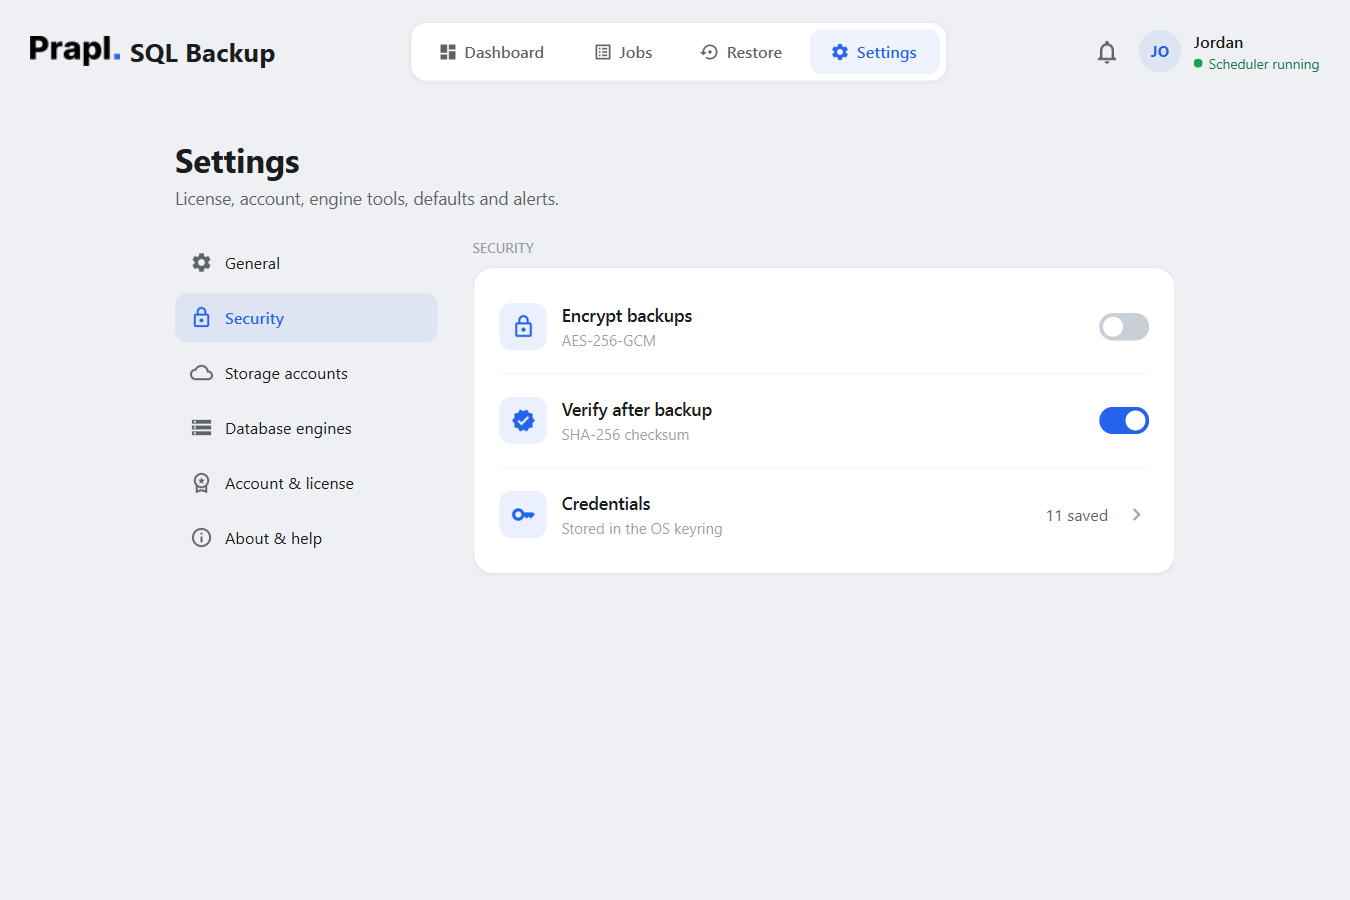
Settings › Security: encryption, verification and where your passwords live.
- Encrypt backups — switch on AES-256 encryption for new jobs and set the encryption password. Keep that password somewhere safe: there is no "forgot password" for an encrypted backup.
- Verify after backup — check every file against its SHA-256 fingerprint after it's written, so a corrupted file is caught immediately.
- Credentials — shows how many database and cloud passwords are stored in the Windows Credential Manager. They never sit in a plain file.
Storage accounts
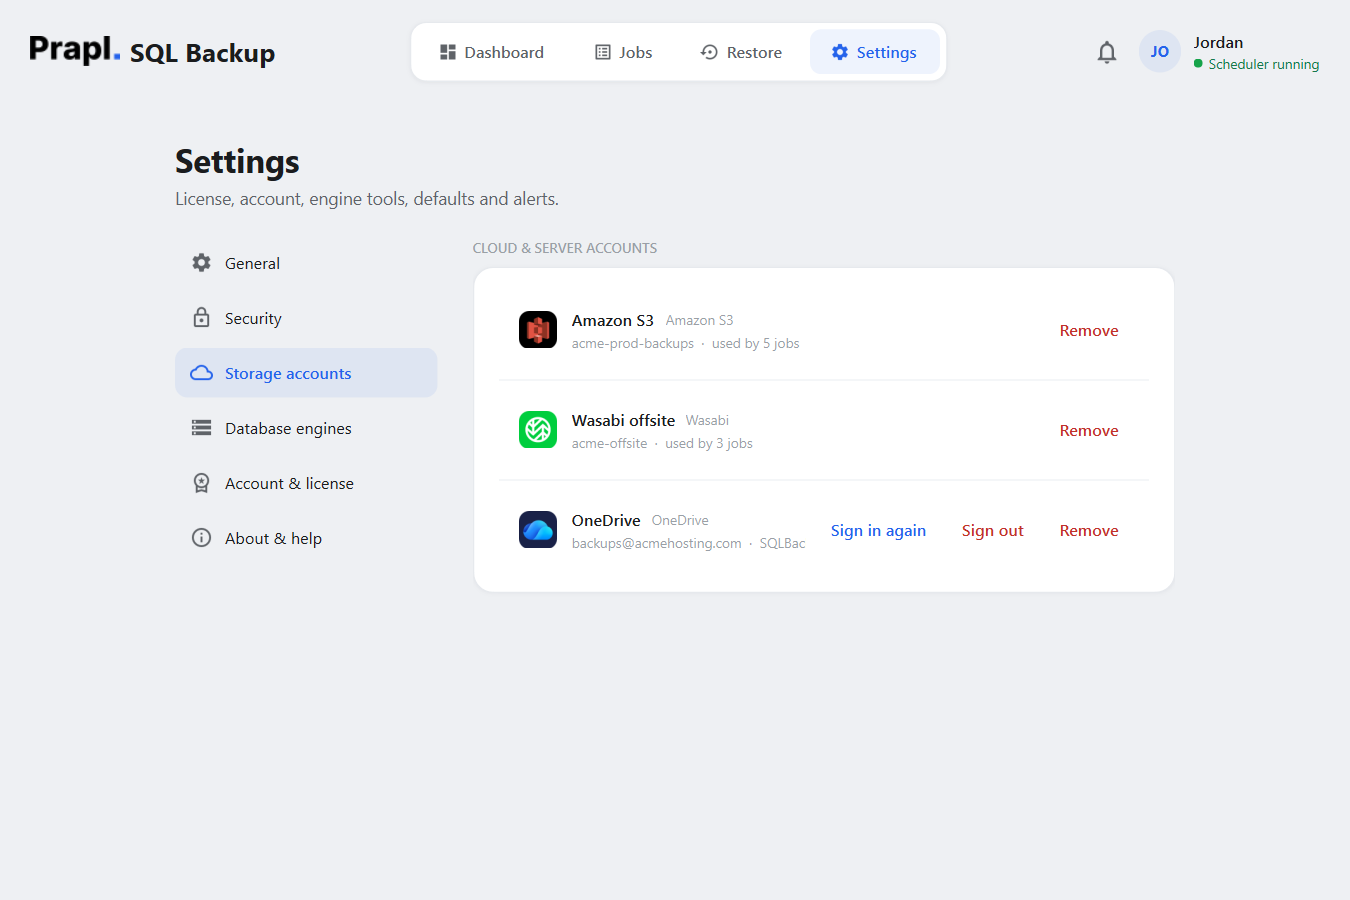
Settings › Storage accounts: every cloud and server destination you've saved.
Every OneDrive account, cloud bucket and SFTP/FTP server you've used is listed here with where it points, whether it's signed in, and how many jobs use it. Sign in again fixes a OneDrive account whose access has expired, Sign out forgets it (jobs that back up there will fail until someone signs in again), and Remove deletes the saved connection — never the backup files already stored there. The app won't let you remove a destination that is the only place a job backs up to.
Database engines
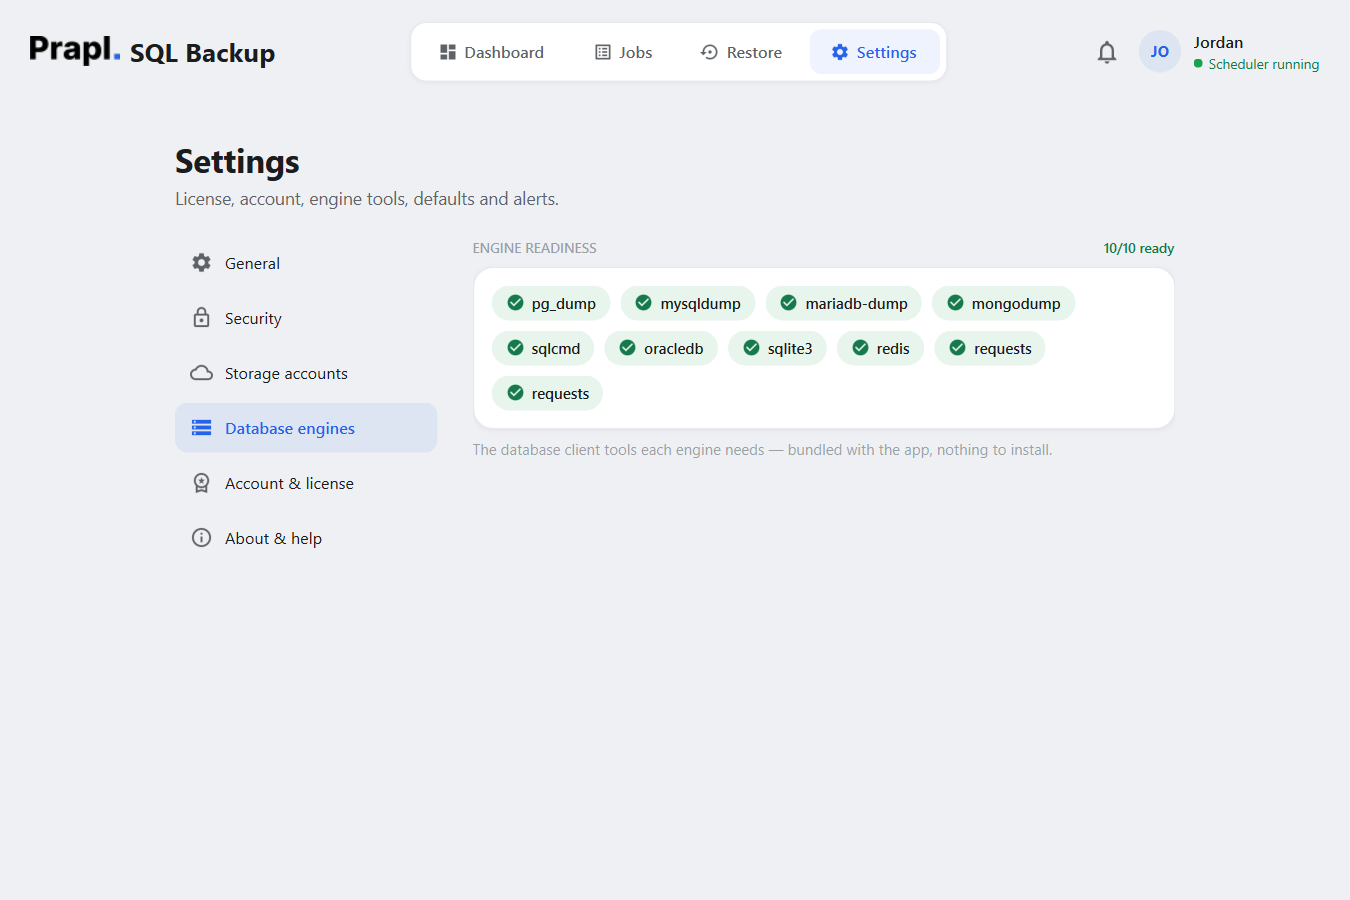
Settings › Database engines: green means ready — nothing to install.
A readiness check for each of the ten engines. Everything the app needs ships inside it, so these are green from the first launch. If one ever shows "missing", support can help — reinstalling usually fixes it.
Account & license
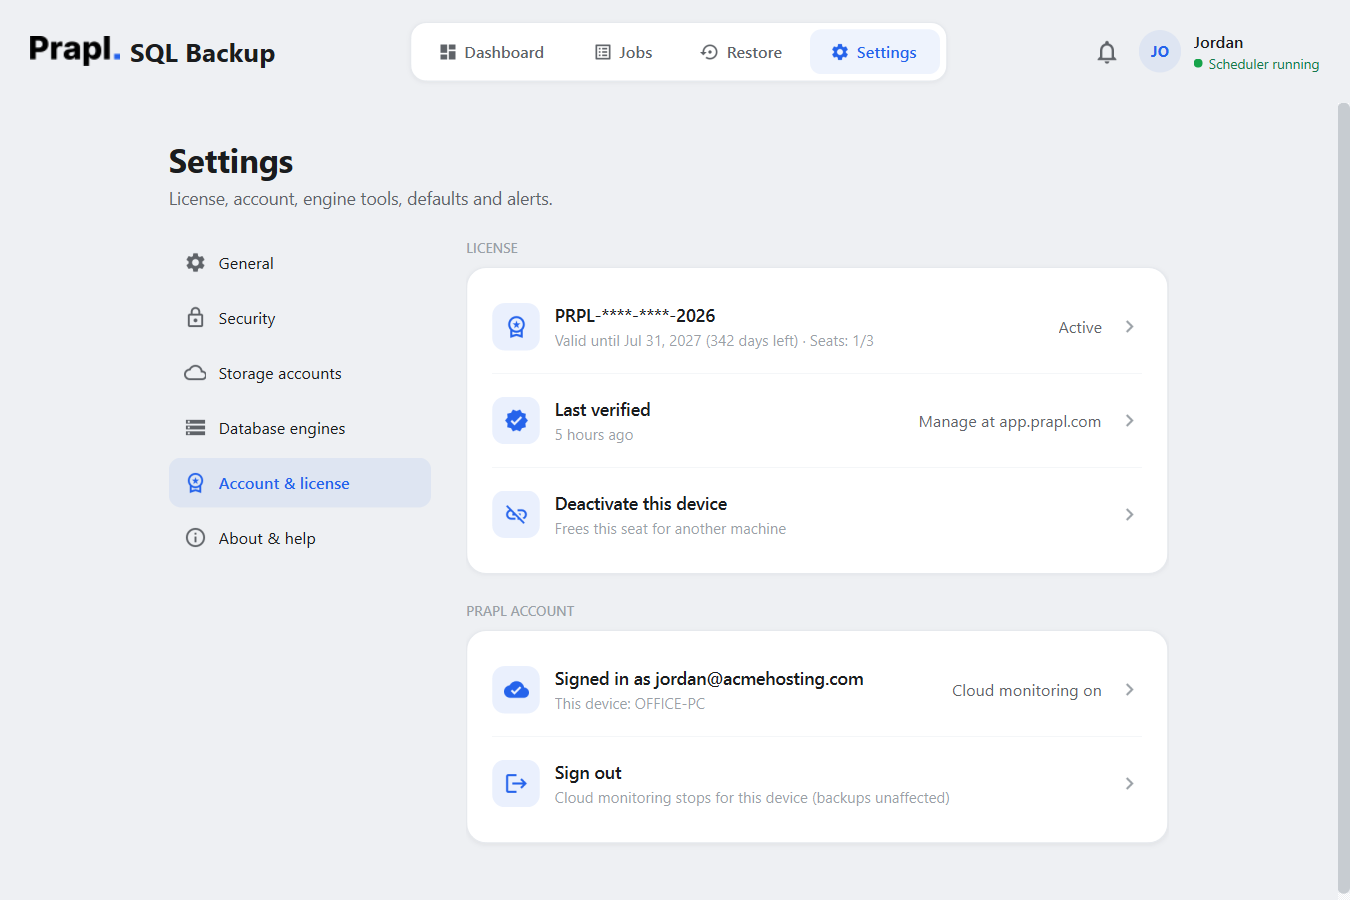
Settings › Account & license: your licence, and the optional cloud-monitoring sign-in.
Your trial days or licence details live here: Enter license key, the masked key, valid-until date, seats in use and Deactivate this device (see Entering your licence key). Below it is Cloud monitoring — sign in with a free Prapl account to see your backups from anywhere; see Alerts & cloud monitoring.
About & help
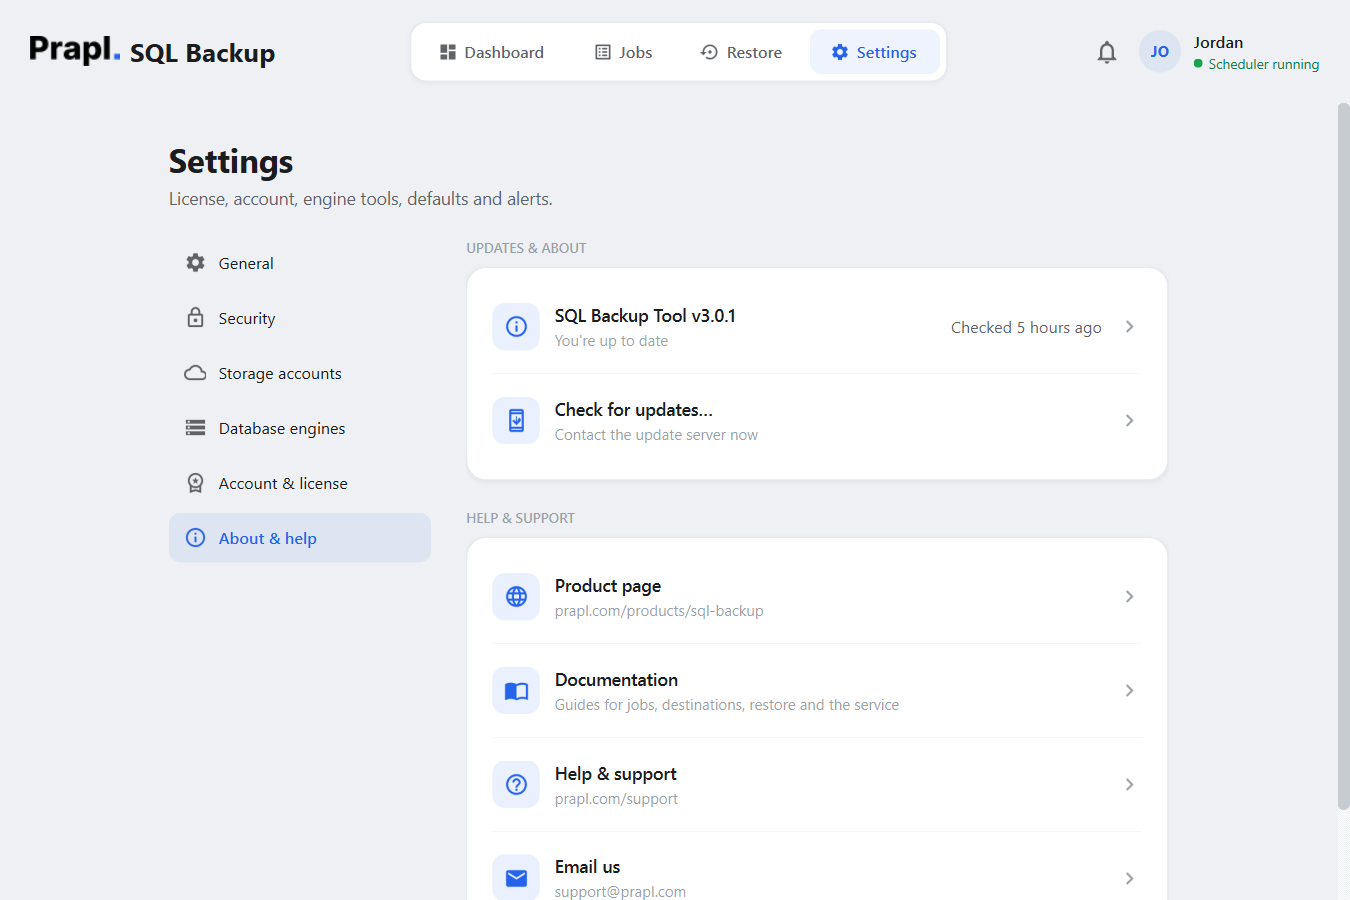
Settings › About & help: version, updates and where to get help.
Shows the version you're running and whether an update is available, with Check for updates… and links to this documentation and to support.
Notifications & the tray icon
The bell
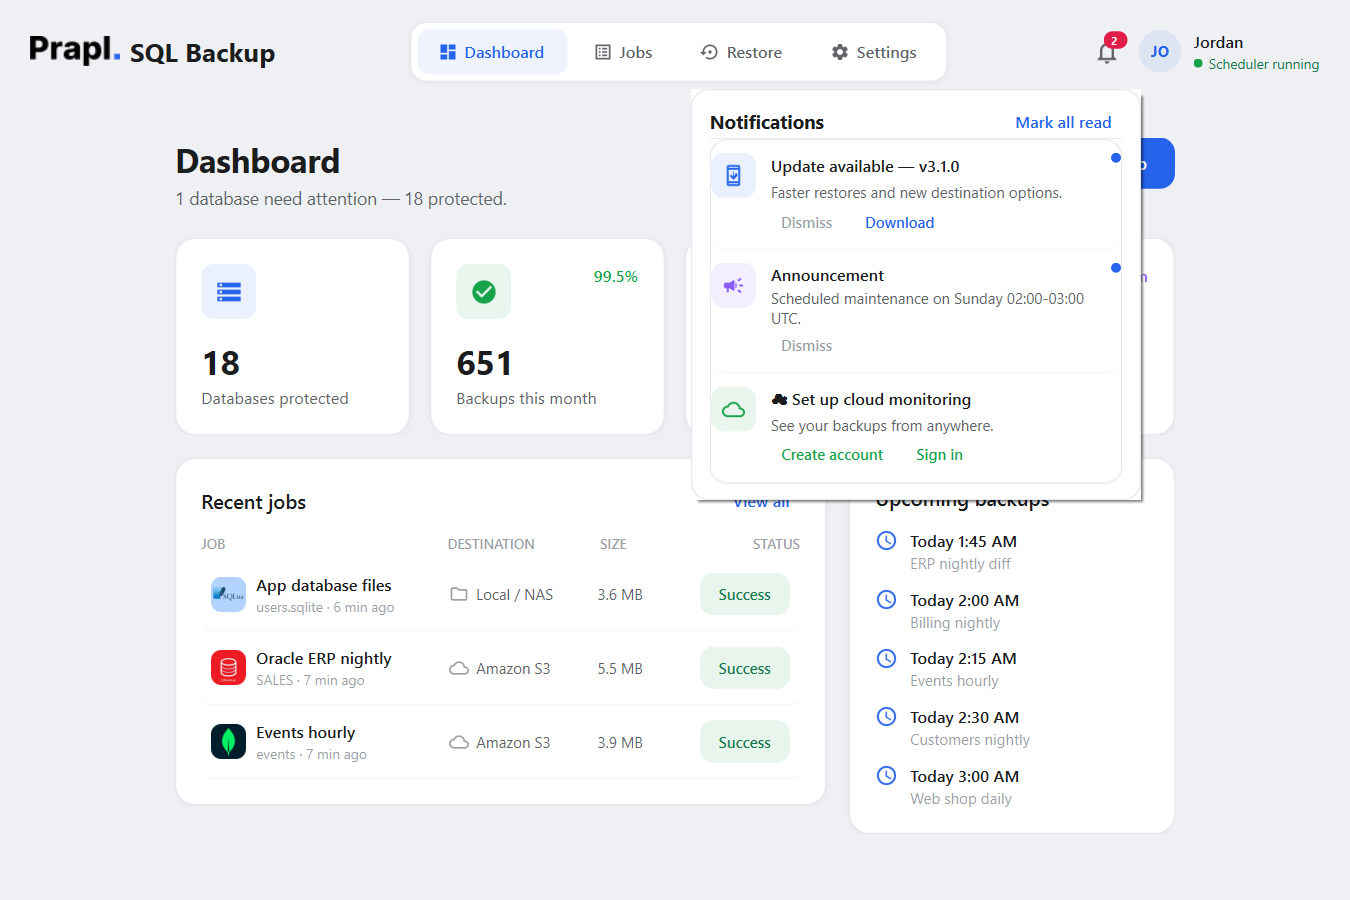
The bell in the top-right corner collects things worth knowing.
The bell shows a badge when there's something for you: a new version (with a Download button), an announcement, or a licence renewal reminder. Each card can be dismissed. Nothing here is urgent chatter — a normal day has no notifications at all.
The tray icon
Closing the window doesn't stop your backups. The app slips into the Windows system tray (next to the clock) and its scheduler keeps running; the first time this happens a small balloon tells you so. Double-click the tray icon to bring the window back, or right-click it for Open SQL Backup, Check for updates and Exit. Only Exit really quits the app — and while it's not running, no backups are taken. The green "Scheduler running" dot beside your name in the header confirms everything is ticking.
The ten databases you can back up
One app, ten database types. Whichever you use, the wizard is the same — only the connection form on step 2 changes. Here is exactly what each one asks for, and what's good to know.

Microsoft SQL Server
Installed on this PC · SQL Server Express includedWhat to enter: nothing, usually. The app connects to the SQL Server on this computer with your Windows account and lists its databases automatically. Click Advanced options… only if you use a SQL login (then enter username and password), a named instance (enter it as localhost\SQLEXPRESS) or a custom port.
Good to know: backups use SQL Server's own native backup engine, so they're the same .bak files a database administrator would make. The app backs up SQL Server installed on the same machine; a SQL Server on another computer isn't supported yet. Transaction-log backups need the database to be in "full" recovery mode — if it isn't, the app tells you exactly what to change.

MySQL
Self-hosted, hosting panels, Amazon RDS, Aurora, DockerWhat to enter: Host, Port, Username, Password — or paste a connection string. Username is required.
Good to know: incremental and differential backups need "binary logging" switched on at the server; most hosting providers have it on already, and the app tells you if not. Backups are standard .sql files.

PostgreSQL
Self-hosted, Neon, Supabase, Amazon RDS, Azure, DigitalOcean, Aiven, TimescaleWhat to enter: Host, Port, Username, Password — or paste the connection string your hosting service gives you (Neon, Supabase and RDS strings, including their SSL settings, work as-is).
Good to know: for a PostgreSQL 17 or newer server installed on this PC, step 4 offers a Method choice: Per database (the normal choice) or Whole server, which copies the server's data files as one unit and enables block-level incremental backups. A whole-server restore replaces every database on that server, so it's for self-hosted servers only. Hosted PostgreSQL always uses per-database full backups.

MongoDB
Self-hosted, MongoDB Atlas, DockerWhat to enter: Host, Port, and Username / Password if your server uses them (many local ones don't) — or paste an Atlas mongodb+srv:// connection string.
Good to know: incremental and differential backups use MongoDB's "oplog", which only exists on replica sets — Atlas dedicated clusters qualify, the free shared tiers (M0/M2/M5) don't. When restoring a chain of incremental backups, keep the original database name.

MariaDB
Self-hosted, hosting panels, cloudWhat to enter: Host, Port, Username, Password — or a connection string. Exactly like MySQL.
Good to know: the app uses MariaDB's own tools for MariaDB servers, so newer MariaDB features are backed up correctly. Everything said about MySQL applies.

Oracle Database
On-premises, Oracle Cloud, Autonomous Database · 12.1 or newerWhat to enter: Host, Port, Service name (e.g. FREEPDB1 — the pluggable database), Username and Password. Oracle always needs a username and password, even on this PC.
Good to know: no Oracle client software is needed — most Oracle tools make you install "Instant Client" first; this app doesn't. You back up schemas rather than databases, so step 2 lists the schemas to choose from. Step 4 offers a Format choice: SQL export (a readable, portable file) or Data Pump (Oracle's own format — pick this for schemas that use XMLType, Spatial or very large tables).

SQLite
Desktop apps, mobile app back-ends, small websitesWhat to enter: just the Database folder — the folder your application keeps its .db / .sqlite files in. There's no host, port or password because SQLite is a file, not a server.
Good to know: step 2 lists every database file found in that folder; tick the ones to back up. Snapshots are taken safely while your application is still running, and every copy is integrity-checked before it's stored. Encrypted (SQLCipher) databases can't be backed up — use your application's own export for those.

Redis
Self-hosted, Redis Cloud, Upstash, ElastiCacheWhat to enter: Host, Port, Password (and Username if your server uses one), and TLS: yes for endpoints that start with rediss://.
Good to know: Redis numbers its databases (0–15) instead of naming them. Every key and its expiry time is saved, for all data types. If your Redis is only a cache, you probably don't need to back it up. Redis Cluster (data spread over several nodes) isn't supported — back up each node individually.

ClickHouse
Self-hosted, ClickHouse CloudWhat to enter: Host, Port, Username (the default user is called default, often with no password), Password, and HTTPS: yes for ClickHouse Cloud.
Good to know: use the HTTP port (8123, or 8443 for HTTPS), not the "native" port 9000 — that's the one mistake everyone makes. The app skips ClickHouse's internal system databases automatically.

Elasticsearch & OpenSearch
Elasticsearch 7 and 8, OpenSearch, Elastic CloudWhat to enter: Host, Port, HTTPS: yes for Elastic Cloud and Elasticsearch 8 (which turns on HTTPS by default), then either Username and Password or an API key.
Good to know: you back up indices — step 2 lists them to choose from. Mappings and analyzers are kept, so a restored index searches exactly like the original. The cluster's own system indices are left alone on purpose.
Where backups can go — nine destinations
A backup sitting next to the database it protects isn't much of a backup — one dead disk takes both. Pick anything below on step 3 of the wizard, and add a secondary backup to keep a second copy somewhere else.
 Local / NAS
 OneDrive
 AWS S3
 Wasabi
 Backblaze B2
 Cloudflare R2
 MinIO
MinIO
 SFTP
SFTP
 FTP
FTP
| Destination | What to enter | Good to know |
|---|---|---|
| Local / NAS a folder on this PC, an external drive, a network share | Backup folder — click Browse… and pick it (e.g. D:\SQLBackups or \\NAS\backups). The app suggests a sensible folder for you. | Simplest and fastest to restore from. Pair it with a cloud destination as the secondary copy. |
| OneDrive personal, work or school accounts | Click Sign in with Microsoft — your browser opens once — then choose the OneDrive folder (default SQLBackup, created if missing). | No password is stored; the app is granted access to your OneDrive files. If access ever lapses, Settings › Storage accounts › Sign in again fixes it. |
| AWS S3 | Bucket, Region, Access key, Secret key. | Create an access key for a user that can read and write that bucket. |
| Wasabi | Bucket, Region, Access key, Secret key, Endpoint URL — e.g. https://s3.eu-central-1.wasabisys.com. | These four all work like S3 and need the Endpoint URL from your provider's console. For Cloudflare R2 the endpoint is https://<account-id>.r2.cloudflarestorage.com and the region is auto. A MinIO server on your own network typically uses http://server:9000. |
| Backblaze B2 | Bucket, Region, Access key (key ID), Secret key (application key), Endpoint URL — e.g. https://s3.us-west-004.backblazeb2.com. | |
| Cloudflare R2 | Bucket, Region (auto), Access key, Secret key, Endpoint URL. | |
| MinIO | Bucket, Region, Access key, Secret key, Endpoint URL. | |
| SFTP any server you can reach over SSH | Host, Port (22), Username, Password, Base path (the folder on the server). | Encrypted end to end. The server's identity is remembered on first connection and checked every time after. |
| FTP | Host, Port (21), Security, Username, Password, Base path. | Leave Security at FTPS — encrypted (recommended). Choose plain FTP only if your server can't do FTPS — it sends everything unencrypted. |
Full, incremental, differential — which should I pick?
Full is the right answer for almost everyone: a complete copy of the database every time, simple to understand and simple to restore. Pick the others only when your backups are large and you want them to run faster and take less space.
| Type | What it means | Available for |
|---|---|---|
| Full | A complete copy of the whole database, every time. Simplest and safest; each file restores on its own. | Every engine |
| Incremental | Saves only what changed since the last backup of any kind. Smallest and fastest, ideal for frequent backups. Restoring means the full backup plus every change since — the app assembles that chain for you automatically. | MySQL & MariaDB · MongoDB (replica sets / Atlas dedicated) · PostgreSQL 17+ self-hosted (whole-server mode) |
| Differential | Saves everything changed since the last full backup. Bigger than incremental, but a restore only needs two files. | SQL Server · MySQL & MariaDB · MongoDB (same requirements as incremental) |
| Transaction log | SQL Server's own fine-grained backup of every change since the last backup; the database must be in "full" recovery mode. | SQL Server |
Incremental and differential jobs get one extra option on step 4: Fresh full copy every N days (7 by default), which starts a new chain regularly so restores stay quick. Retention understands chains too — a full backup is never deleted while newer change files still need it. And if the server can no longer supply the changes (for example its logs were cleared), the app quietly takes a full backup instead of failing.
Schedules & retention — set it once, forget it
Schedule and clean-up are one setting, because they belong together. On step 4 of the wizard you get four rows:
| Row | Means | Default |
|---|---|---|
| Daily · keep last N days | a copy every day, keeping the newest N | on, keep 7 |
| Weekly · keep last N weeks, on weekday | one copy a week is kept for N weeks | off, keep 4, Monday |
| Monthly · keep last N months, on day D | one copy a month is kept for N months | off, keep 6, day 1 |
| Yearly · keep last N years, on date | one copy a year is kept for N years | off, keep 1, 1 January |
- The most frequent row that's switched on decides how often the job runs. Daily on = the job runs every day at the Run at time (2:00 AM unless you change it).
- The other rows don't add extra runs — they decide which copies are kept longer. "Daily 7 + Weekly 4 + Monthly 6" means: every day's backup for a week, one per week for a month, one per month for half a year — 17 restore points, always current, never piling up.
- After every successful run the app deletes copies that fall outside these rules ("Applying retention…"), separately for each destination. Your storage never overflows.
- Everything off = manual: the job runs only when you click Run on the Jobs screen, and every copy is kept.
The wizard offers daily, weekly, monthly and yearly. If you need something else — every few hours, say — support can set that up for you.
Compression, password protection & encryption
Compression shrinks backups as they're made — typically 5–10× smaller — so they upload faster and cost less to keep. It's the Compress (gzip) switch on step 4, on by default, and there's rarely a reason to turn it off.
Password protection locks each backup file before it leaves your computer. Whoever hosts your storage — Microsoft, Amazon, your NAS, anyone — only ever sees scrambled data. Two flavours:
- ZIP with password — a password-protected zip file. Opens in 7-Zip, WinRAR or PeaZip on any computer with just the password; nothing else to install. (Windows Explorer's built-in zip viewer can't open password-protected zips.)
- Advanced: AES-256 — the strongest option, using the same grade of encryption banks use. These files open only in SQL Backup Tool. Choose this if the backups must stay unreadable no matter where they end up.
Checksum verify (on by default) gives every backup a SHA-256 fingerprint and checks the file against it after writing, so a corrupted or altered file is caught immediately rather than on the day you need it.
Runs in the background — and catches up on missed backups
- Closing the window doesn't stop anything. The app hides in the system tray and keeps running your schedule. With Start with Windows on, it's there from the moment you log in.
- PC was off at backup time? The moment the app starts again it notices the missed run and takes the backup straight away — no silent gaps. Several missed jobs are spaced out a little so they don't all hit your connection at once.
- Laptop was asleep? Same thing: on waking up, the app checks for backups it missed and runs them.
- No internet right now? A backup that needs the internet (a remote database or a cloud destination) waits up to an hour for the connection to come back before giving up, rather than failing on the spot.
- Several backups due together? They run two at a time by default (Settings › General › Simultaneous backups); the rest queue up. A job never runs twice at once.
- Working on the PC meanwhile? Backups stream in the background with a live progress bar; nothing freezes.
Backups only run while the app is running (in the window or in the tray). If you use the tray icon's Exit, remember to open the app again — or leave Start with Windows on and never think about it.
Alerts & cloud monitoring — know the moment something fails
The most dangerous backup is the one that stopped working months ago without anyone noticing. Three layers keep you informed:
- Desktop notifications — a small Windows toast when a backup finishes (Settings › General).
- The Dashboard and History — a red Failed badge is impossible to miss, and clicking it tells you why in plain words.
- Failure alerts by email, from anywhere — connect the app to a free Prapl account and our cloud service watches your schedule. If a backup fails, or simply doesn't show up when it should, you get an email — even if the PC is off. You can also see the status of all your computers' backups in a web browser, wherever you are.
Setting up cloud monitoring
- Go to Settings › General › Failure alerts and click Set up (or Settings › Account & license › Cloud monitoring).
- Sign in with your Prapl account, or click Create an account — it's free and takes a minute.
- Give this computer a Desktop name (your PC's name is suggested) so you can tell your machines apart in the dashboard.
Cloud monitoring only ever receives backup status — never your database contents, backup files or passwords. It's optional and never affects what the app can do; sign out any time from the same place.
Keeping the app up to date
The app checks for new versions quietly in the background. When one is available you'll see it in the notification bell and under Settings › About & help. Click Download: the update is fetched and verified inside the app, then a button reads Install new version. Installing closes the app and reopens it a few seconds later — your jobs, settings and licence are kept. You can also check at any time with Check for updates… in Settings or the tray menu.
Your backup files — what they look like
Whichever destination you use, backups are organised the same way, so you can always find them by hand:
<job name> / <database> / <date> / <database>_<type>_<time>.<ending>
For example Web shop nightly\webshop\2026-08-25\webshop_full_02-00-00-123.sql.gz.enc. The endings tell you what was done to the file:
| Ending | Meaning |
|---|---|
.sql · .dump · .bak · .archive · .db · .dmp … | The raw backup, in the native format of that engine (MySQL/MariaDB .sql, PostgreSQL .dump, SQL Server .bak, MongoDB .archive, SQLite .db, Oracle Data Pump .dmp). |
.gz | Compressed. |
.enc | Encrypted with AES-256 (opens only in this app). |
.zip | Password-protected zip (opens in 7-Zip, WinRAR, PeaZip). |
You never need to handle these yourself — Restore does it all — but it's reassuring to know your backups are ordinary files you could take anywhere. The app's own settings and history live in %APPDATA%\SQLBackup on your PC; passwords live in Windows Credential Manager.
Uninstalling
Removing the app is as quick as installing it, and it's built so you can't lose anything by accident.
- Open Windows Settings → Apps → Installed apps (on Windows 10: Apps & features), find Prapl SQL Backup, click the ⋯ menu and choose Uninstall. Alternatively, open the Start menu and click Uninstall Prapl SQL Backup in the Prapl SQL Backup folder.
- Confirm. If the app is running in the tray, the uninstaller closes it for you.
- Done — the app, its bundled tools and its shortcuts are gone, and it no longer starts with Windows.
What stays, on purpose
- Your backup files stay exactly where they are — in the folder, drive, OneDrive or cloud bucket you chose. Uninstalling never deletes a backup.
- Your settings, jobs and history stay in
%APPDATA%\SQLBackup, so if you reinstall later everything comes back as it was. - Your licence seat is freed automatically during uninstall, ready for another computer. (No internet at that moment? Just use Deactivate this device on your account page, or ask us.)
Removing every trace
If you want a completely clean machine, after uninstalling:
- Delete the folder
%APPDATA%\SQLBackup(paste that into the address bar of File Explorer). This removes your saved jobs, settings and history. - Open Credential Manager → Windows Credentials and remove the entries named SQLBackup — these are the database and cloud passwords the app kept for you.
- Used OneDrive? You can also revoke the app's access at account.microsoft.com → Apps and services.
- Delete the backup files themselves from your destination if you no longer want them — the app will never do that for you.
Troubleshooting — common messages and what to do
| You see… | What it means and what to do |
|---|---|
| "Test & list databases" fails with connection refused or could not connect | The server can't be reached from this PC. Check the host name and port, that the database server is running, and that a firewall or your hosting provider allows connections from your computer's address. For hosted databases (RDS, Neon, Atlas…) copy the connection string from the provider's console instead of typing the parts. |
| The test fails with access denied / authentication failed | Wrong username or password, or that user isn't allowed to connect from this PC. Try the same details in your usual database tool; for MySQL on a hosting panel, make sure "remote access" is enabled for your IP. |
| SQL Server: "backs up SQL Server on this machine…" | You entered a server on another computer. This version backs up the SQL Server installed on the same PC as the app — install the app on that machine, or connect to localhost. |
| SQL Server: "transaction-log backups need the FULL or BULK_LOGGED recovery model" | That database is in "simple" recovery mode, which has no transaction log to back up. Either choose Full or Differential as the backup type, or ask your administrator to switch the database to full recovery (the message includes the exact command). |
| MySQL / MariaDB: "binary logging is not enabled" | Incremental and differential backups need the server's binary log. Switch the job to Full, or ask your host to enable binary logging. |
| ClickHouse: the test fails on port 9000 | Use the HTTP port — 8123, or 8443 for HTTPS — not the native port 9000. |
| SQLite: "…looks encrypted (SQLCipher)" | The file is an encrypted database the app can't open. Use your application's own export instead. |
| SQLite: "…is in use by another program, so restoring over it would corrupt it" | Close the application that uses this database, then restore again. |
| Oracle: "This Oracle server is too old…" | The app supports Oracle 12.1 and newer. Older servers must be backed up with Oracle's own tools. |
| Redis: "This is a Redis Cluster…" | Keys are spread over several nodes; back up each node individually. |
| A run shows Success but History mentions "copy to '…' failed" | The backup was stored at its primary destination but the secondary copy failed — usually a signed-out OneDrive or an unreachable server. Check Settings › Storage accounts and sign in again. |
| A OneDrive destination shows NOT signed in | Access has expired or was revoked. Settings › Storage accounts › Sign in again. Jobs that back up there fail until you do. |
| "Sign-in timed out" while connecting OneDrive | The browser window wasn't completed in time. Click Sign in with Microsoft again and finish the Microsoft login. |
| A scheduled backup didn't run overnight | Was the app running? Backups only run while it's open or in the tray. Turn on Start with Windows (Settings › General), and don't use the tray icon's Exit. If the PC was off, the app runs the missed backup as soon as it starts. |
| The Dashboard says Backups are paused | The trial has ended, or the licence couldn't be verified for more than 7 days offline. Connect to the internet, or enter your licence key (Settings › Account & license). History and Restore keep working meanwhile. |
| "All N seats are in use" when activating | Your licence is already active on its maximum number of computers. Use Deactivate this device on one of them (or your account page) and try again. |
| A restore says the backup file is truncated | The file is incomplete — usually a copy that was interrupted. Pick an earlier backup in step 2, or the same backup from your secondary destination. |
Still stuck? Contact support with the exact message from History and we'll sort it out — during your first restore, we'll happily walk you through it live.